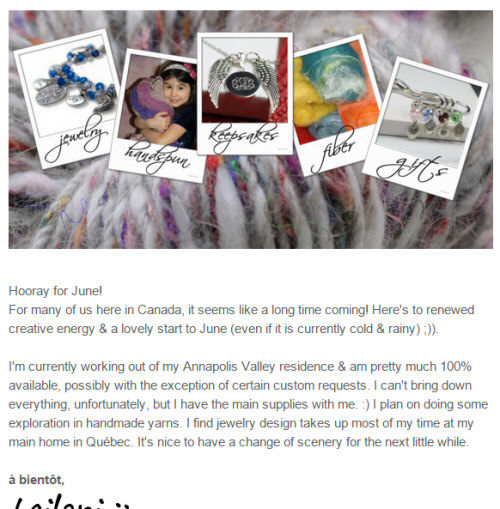
June 2015’s bb3 project newsletter is available! This month there is a chance to win an engraved butterfly necklace. Just click on the image above to read and find out more…
![]()
June 2015’s bb3 project newsletter is available! This month there is a chance to win an engraved butterfly necklace. Just click on the image above to read and find out more…
![]()
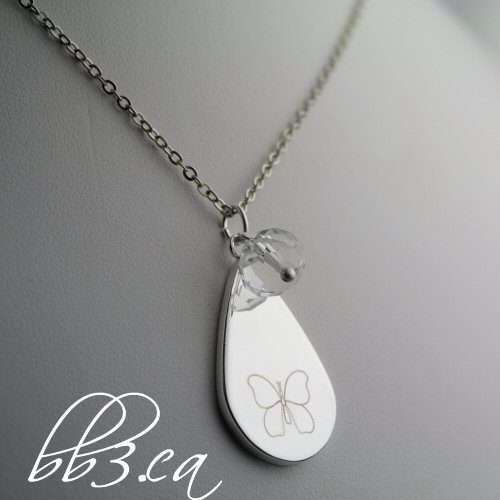
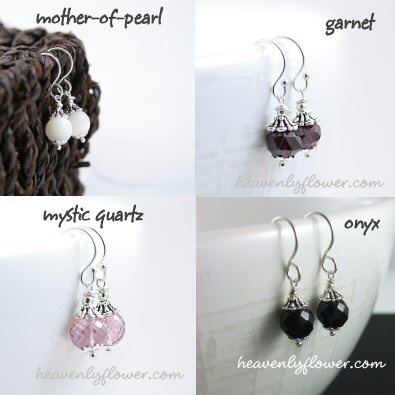
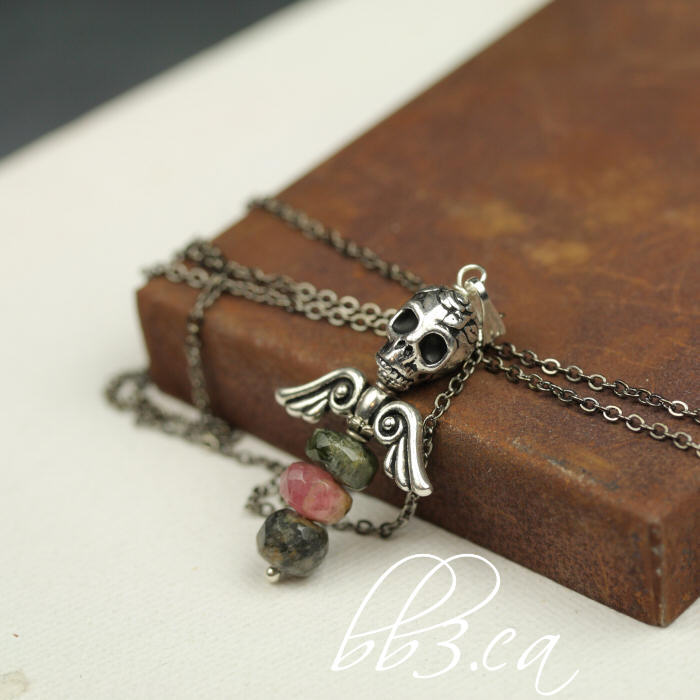
This is a revamped product that I used to offer. The original engraved butterfly teardrop necklace is now available with your choice of eight different bead colors: light blue, grey blue, smoke blue, light pink, citrine yellow, clear, ruby red & gold.
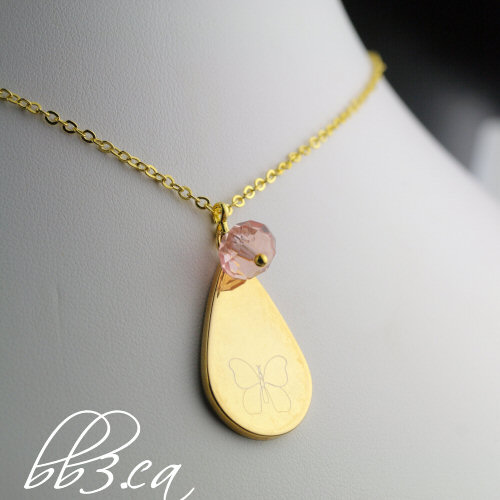
Available in these silver or gold plated brass teardrop pendants. They have a fabulous weight to them & wear very well.
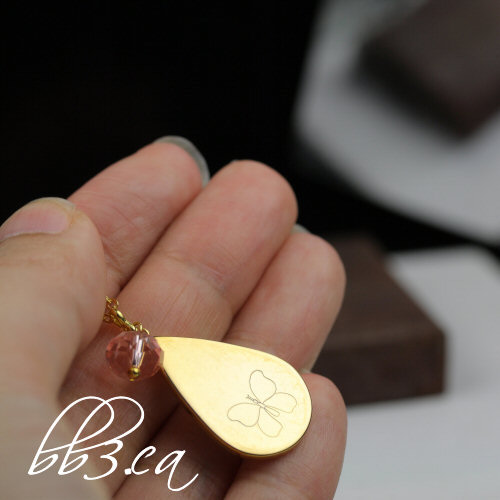
I love these glass beads and use them often. They are weighted and thus have a sparkle similar to crystal. My photos don’t really capture just how pretty they truly are.
The butterfly is a symbol or transformation. These necklaces would be lovely for anyone who has made a major positive change in their life and need to signify it in a tangible way. Or maybe, you just like butterflies… 😉
![]()
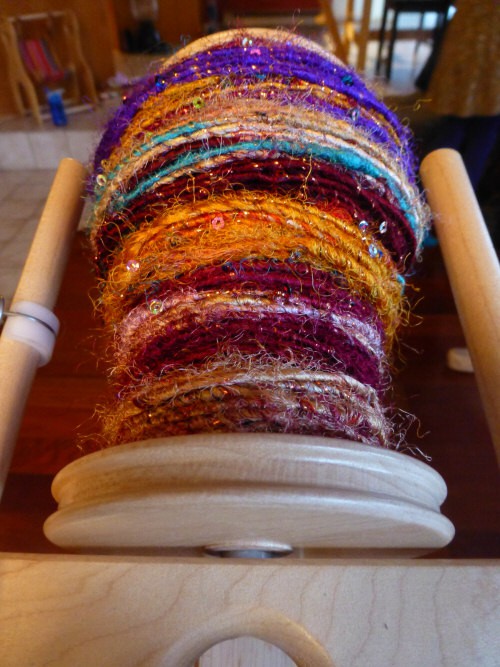
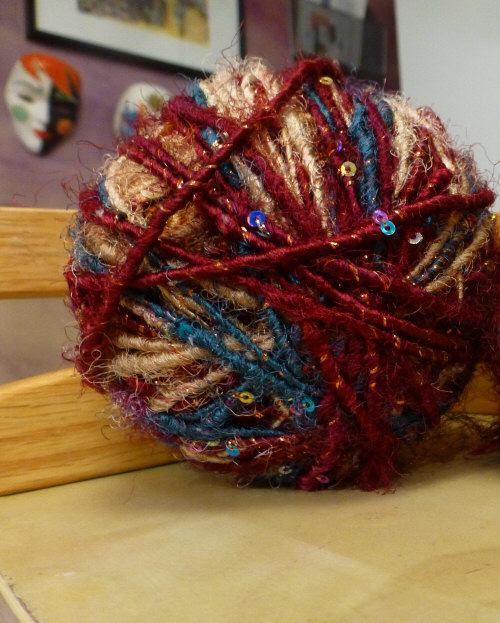
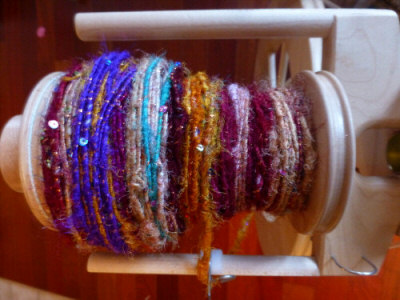
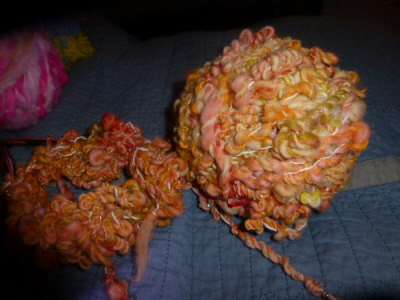
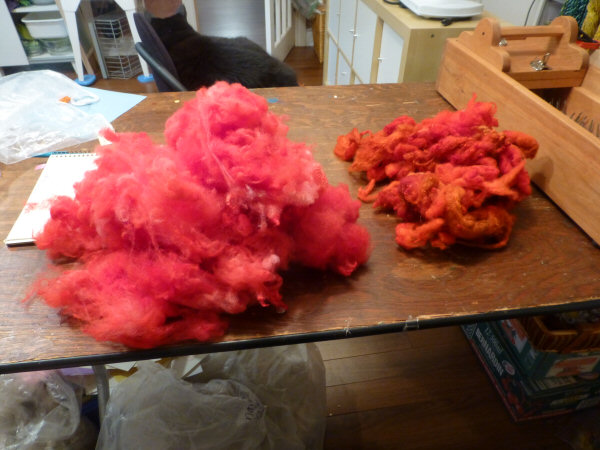
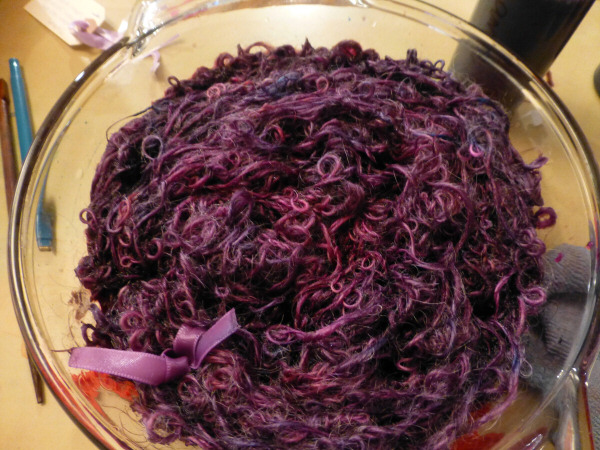
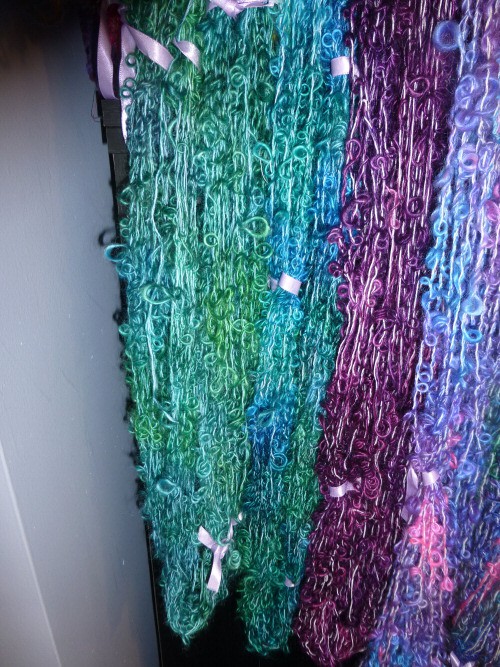
I made this yarn this past winter & it occurred to me that this upcycled handspun yarn is vegan friendly. Most of the yarns I spin are with animal fibers, but this was made using sari silk remnants (banana fibers that are similar to rayon – so not exactly “natural” as the name would suggest). I can’t always get these from the company in Vermont but when I see them I nab them. They are colorful and silky & usually I add them to my batts. This is my first time making a complete yarn out of them. I love the idea of up-cycling a discarded product.
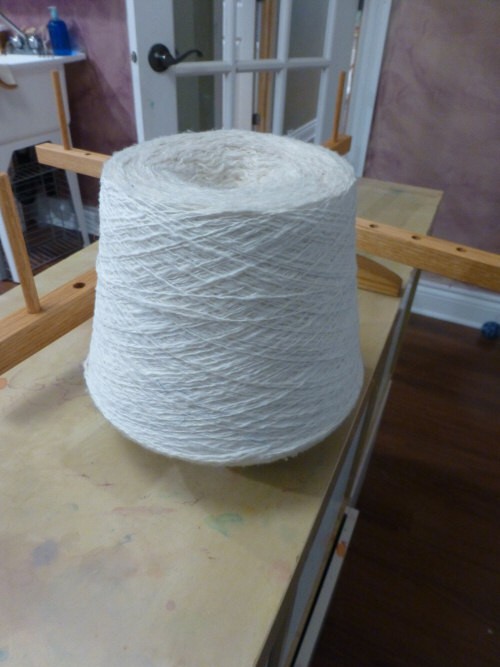
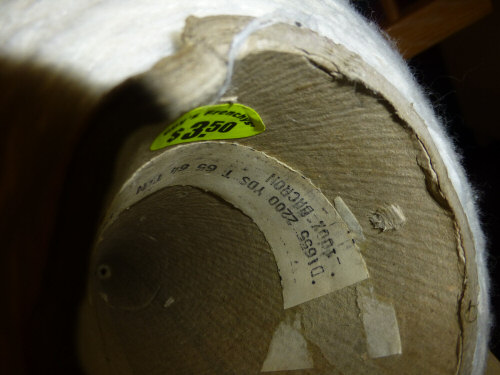
After thinking it over, I decided the best way to showcase these fibers as well as keep it an even diameter was to core wrap spin it. Core wrapping is a technique where you wrap fibers – usually from a batt – around a finished yarn, the core. Many people use commercial yarns for the core. The banana fibers come in a bag in one big mass, so I found it easy to tease out a bit at a time and let it wrap around the core. I used this dacron yarn (polyester) as the core. I found this huge cone of it at a second-hand store for only $3.50! Score!
To add a little more glitz, I added a commercial sequined thread at the same time I was wrapping the fibers. Another bargain find from the clearance section of the craft store. I am a bit of a magpie (or squirrel? Mouse?) when it comes to shiny and cheap things. 🙂
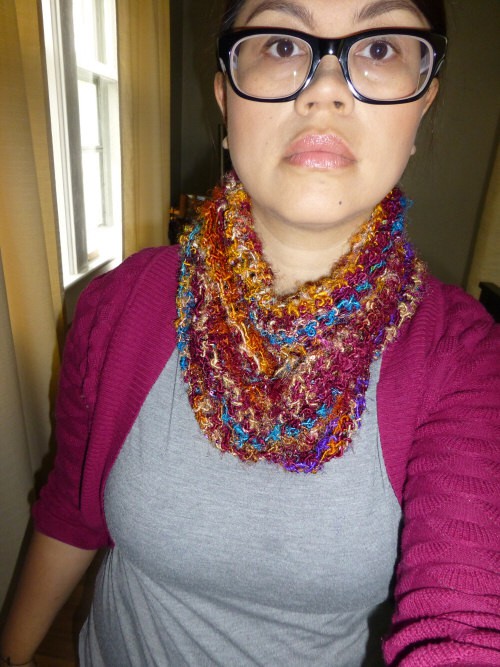
I made a really cool scarf with this yarn, I really wish the pictures would capture the texture better. It’s very organic in feel yet glitzy all at the same time, and naturally 100% unique. I love rocking this!
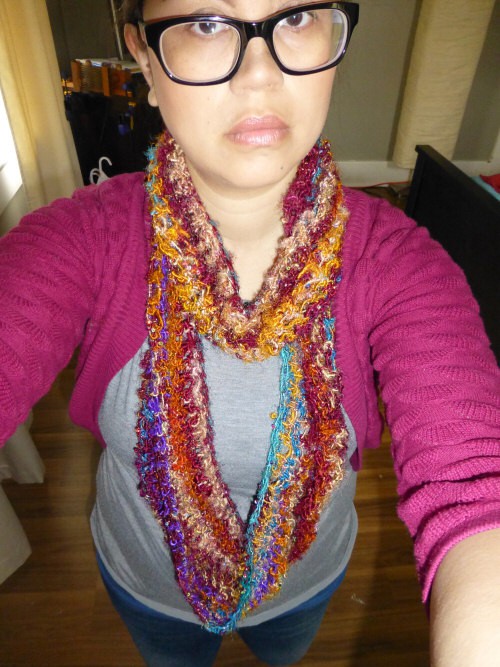
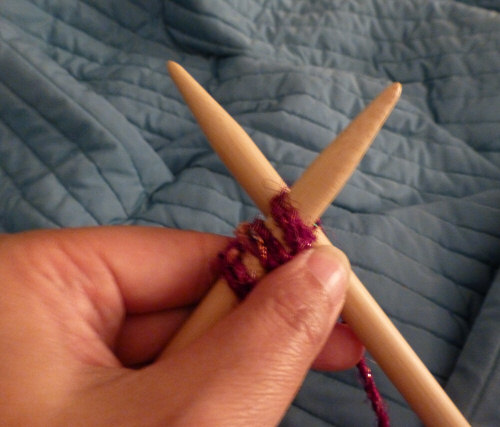
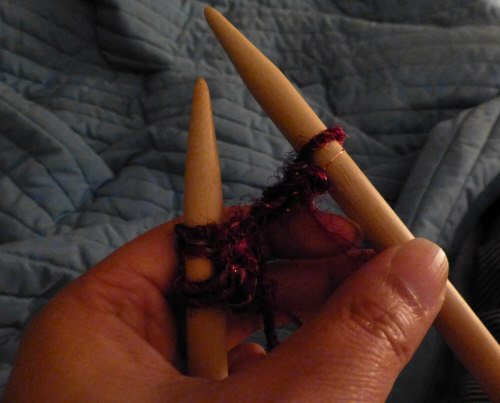
This is a continuous scarf knitted in the round using an elongated stitch. I made it really long (it’s approximately 36″ from top to bottom) because I wanted to be able to fold it over more than once for different looks.
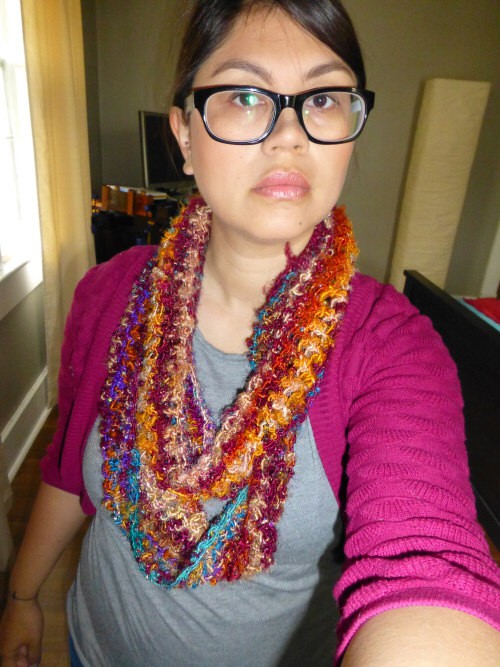
I used size 11 circular needles. As I harp and preach about handspun yarn: go big or go home! 😉 Always go with a larger needle to allow the fibers to open up and have room for any larger sections.
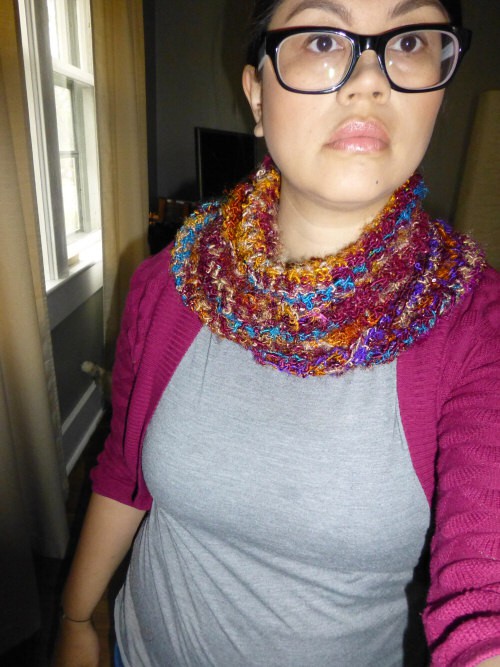
I love elongated stitches and use several methods when knitting my handspun. I love that airy, webby effect and I think it showcases the handspun so well. Not to mention it’s super simple and works up fast. I’ll have instructions for this stitch at the bottom of this post…
Because of the ease with these kind of stitches, I threw this project in my bag and worked on it when I had a passing minute while out on errands. You never have to remember where you left off because it’s all the same until binding off.

Elongated Stitch for continuous scarf
CO desired number of stitches (I CO 110 with size 11 circular needles)
Be sure all stitches are facing the same way, and are not twisted then:
K1;
Insert your left needle into the front of the ST you just created and make a stitch within this stitch: just like a continental purl stitch only using your left needle instead of your right.
Continue until scarf is desired length & CO. It doesn’t get more easy than that!
![]()

We had yet another wonderful Mother’s Day weekend attending the 2015 New Hampshire Sheep and Wool Festival. The show has become a yearly family tradition of ours. One of our favorite stops is the Alpaca barn which was showcasing many babies & adolescents this year. I swear I dropped an ovary or two looking at these cuties! Special shout out to Skyeview Alpacas. Always a pleasure stopping by their booth.
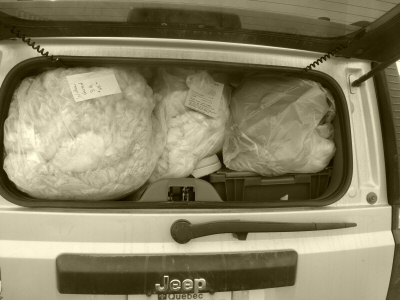
I didn’t take near enough pictures, of course. How could I when there was always a bag of something in my hands?? I took a pic of this year’s take in the back of our Jeep but the camera setting was bumped to monochrome & I didn’t realize it. I guess it doesn’t matter too much since the theme this year was definitely white. Besides the angora rabbit fur and white alpaca fleece from Skyeview, I also came away with 2 bags of merino wool from Joe & Judy Miller to process; 1 lb. of to DIE for (or should I say, to DYE for – har har) white BFL top – I just couldn’t say no; and 3 4oz balls of coopworth top. The only thing of color was 3 hand-dyed 4oz balls of a wool/silk blend to play around with. I normally don’t buy roving anymore. But sometimes it just calls my name. I look forward to doing some experimental dyeing this season. I definitely had some restraint this year, but my studio is over flowing. I really could use a bigger space for processing fleece. I would probably get through it faster if I did. Someday…
![]()
The May 2015 monthly newsletter was unleashed earlier this week with the 3 winners from last month’s giveaway announced, new products, my latest blog challenge and of course, this month’s giveaway – for an “apple of my eye” necklace! Click here to read.
Don’t forget to sign up in order to enter the giveaways.
![]()

I recently found these sweet epoxy apple charms. I love the pop of red color and they were just begging to be made into a necklace. I present you: The Apple of My Eye Keepsake Necklace – or Teacher’s Gift.
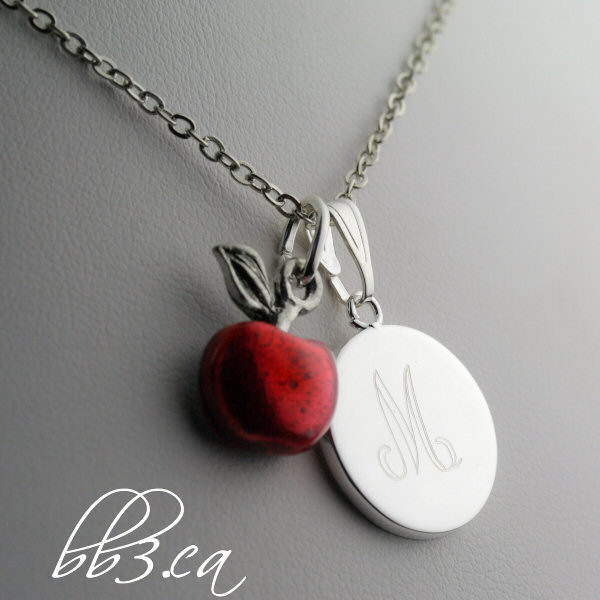
I couldn’t decide which way to go with this when I first set out to do the engraving. I ended up liking both ideas so much I just kept it that way. I love the script letter paired with the apple. I also thought an engraved “TEACH” along with a heart was a nice touch.
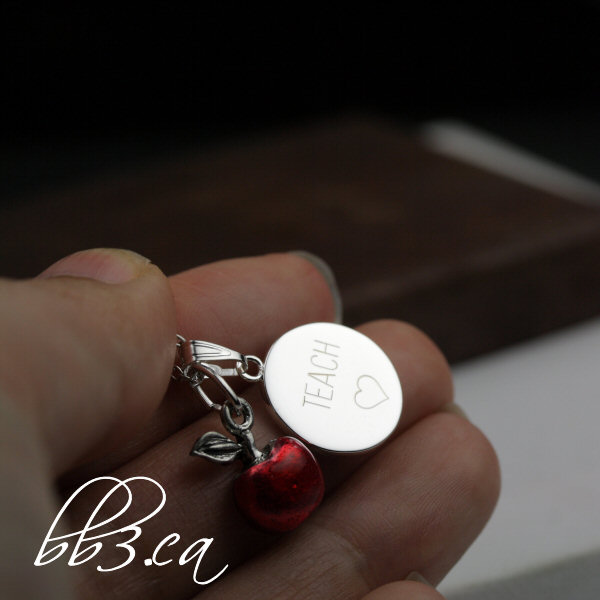
These would make wonderful, affordable teacher’s gifts as well as a sweet message to a loved one: “You are the apple of my eye”.
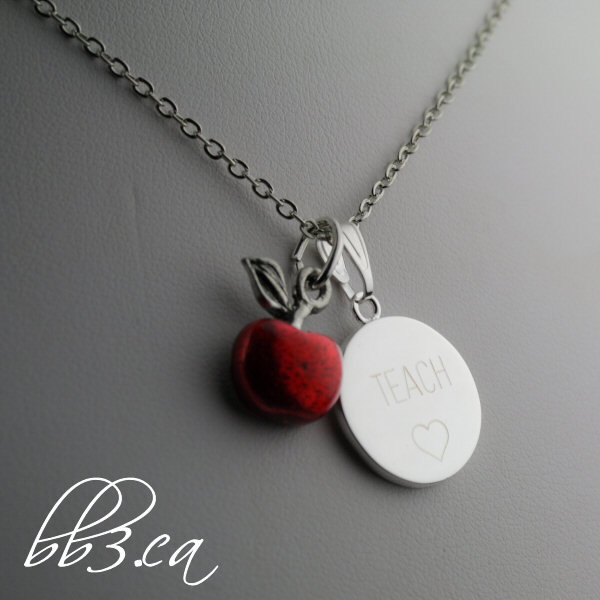
I currently have a limited number of charms as at the time my supplier only had a few available. I’ll see how popular this item is before ordering more (in order to get the best possible price I need to order several hundred dollars worth of goods from my supplier. So I don’t like to do that too many times in the run of a year).
![]()
If you are like me, you like to comb the internet for inspiration. I consider myself a spinner, but not so much a knitter or crocheter. My knowledge of knitting and crochet is actually pretty basic. People tend to be quite surprised by this because the assumption is one starts spinning after mastering the needles.
I taught myself to spin just few months into teaching myself to knit and crochet (the beginning stages, anyway). The story as to how I got started would suit a post on its own, but the fact that I learned about making a textile from the ground up made me appreciate the basics of knit and crochet. Handspun yarn literally has a life of its own. Rather than you making it into what you want it to be, it tells you what it will be. Thus, you gain a respect and appreciation for handspun that you realize is best left to speak for itself.
Because of this, we are often left scratching our heads as to what to do with gorgeous artful textured handspun. I say “we” because I know I am not alone in this. Many of us have that stash of pretty yarns. Because of its unusualness (or its mind-blowing prettiness) it becomes a permanent fixture in the yarn bin like the wall-flower never picked to dance (and we know it really should be the belle of the ball!). Whether it is handspun or an artful commercial yarn, I know many knitters know exactly what I mean. When I started spinning the goal was to make the most even, symmetrical yarn possible. But soon I really wanted to push the boundaries of what yarn is. The problem was I wondered what I could make with such unusual and small amounts of it. I have a growing collection of yarn that I spun that I feel is “too pretty” to use.
So even as a spinner, I find myself taking to the internet to find inspiration. Not patterns. Patterns are no good with such a unique medium. More of a reassurance that others truly are making items out of handspun and it’s not just a pretty yarn to be hung in the studio. I also have this bad habit of over critiquing my yarns and again, a post for another day… I found this wonderful article on craftsy that really sums up what to make with handspun yarn.

Since it is recommended to use larger needles with handspun and to keep the stitches simple, I believe handspun is a great textile for the novice knitter or crocheter, or, if you are like me – those who do not possess the time or patience for a long term project. I want to get back to the wheel, afterall. 😉 It may look intimidating at first. It can be comprised of many bumps, thick and thin sections and even over twisted sections, but when you realize a basic knit or crochet stitch will give you a stunning one of a kind scarf for example, one quickly realizes how how satisfying it is to use. The projects are not only simple, but since they are worked up with large needles, they make the perfect afternoon project.

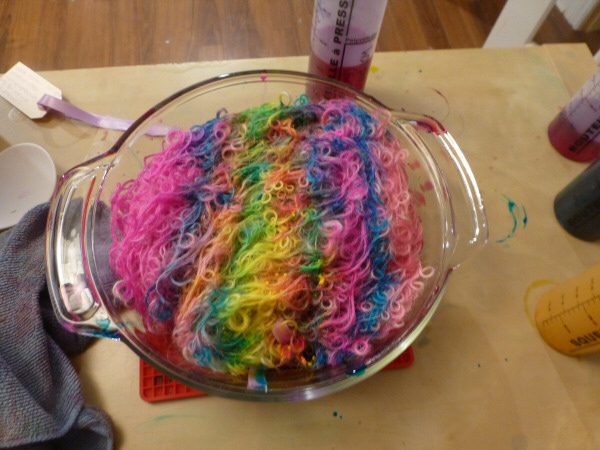
Don’t be afraid to mix your handspun with commercial yarns. I love to make the ribbing of my hats with commercial yarn and then let the handspun be the personality of the rest of the hat. What about a scarf in elogated knit stitch switching back and forth between handspun and commercial? The possibilities can truly be endless, and it is freeing to not have to follow a pattern. Free form crochet is your friend with the leftovers! I’ll be starting a series here on the blog showcasing what I have knit with my handspun. Some will be hits, and some will be misses I am sure. Many of the examples posted here are from my spun seconds pile. I really need to have the courage to tackle that pretty yarn stash. My goal is to share the journey with you so that we can grow together. The yarn is piling up here and I need a butt kick to come up with some projects with it. I do not feel comfortable selling my handspun when I myself do not know what to do with it! With that, I am off to play with that jumbo rainbow yarn pictured above. ![]()

Today is my birthday! To celebrate I have an extra special giveaway with 3 chances to win. April’s giveaway via the newsletter is a game of sorts. You enter telling me your first and second choice of prize from bb3.ca. I’ll draw the first name at random, and they will win their top choice. The second name will get either their first or second choice, whichever one is not already taken. Same with name #3: however, if both of #3’s choices have been taken, I’ll draw for another winner. Clear as mud? Check out the entry form for a more concise explanation. Hey, it’s my birthday, my mind is definitely not on blogging…blah blah blah… 😉
I’m taking entries until April 30th, 2015 11:59EDT. The only thing I ask is that you are a subscriber to the newsletter. You can sign up here and unsubscribe at any time, no problem! The newsletter is a once a month emailed publication, and I do a giveaway every month, so why not? The newsletter helps me share my creative ideas and also keeps me on point, per se. It’s my monthly butt kick to keep the creative juices flowing. 🙂
![]()
The April 2015 newsletter from bb3.ca is hot off the press. April is my birthday month so we are doing an extra special giveaway with 3 chances to win. The draw is always open to newsletter subscribers so make sure you sign up before you enter. 🙂
![]()
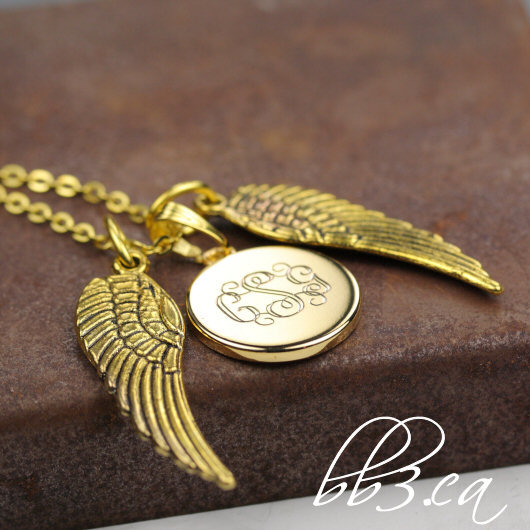
I always try to offer my products in both silver and gold, as I know they are both very popular. With the exception of my sterling silver products, due to the price of gold I find even gold filled can get quite pricey. I know we all are on a budget these days, which is why I do my best to make quality, affordable products that would be suitable for gifts or personal keepsakes.
Most of the engraving blanks I use are silver or gold plated. But they have a marvelous weight and wear very well. I would simply advise against getting them wet or wearing them 24/7 to keep them looking shiny & new. That said, I tend to wear mine constantly, even in the shower. They can take quite a beating until I officially have to retire them.
These following engraving necklaces were available in silver only. I am happy to say I was able to acquire gold charms thus am able to offer a gold option as well:
Gold option is now available in each listing.
![]()
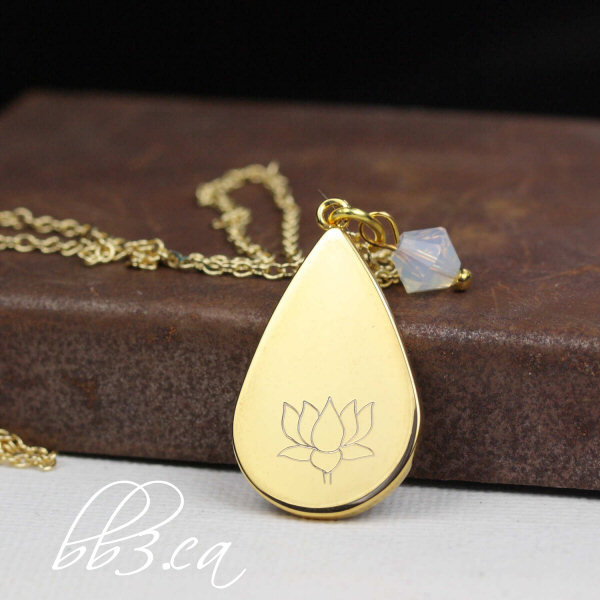
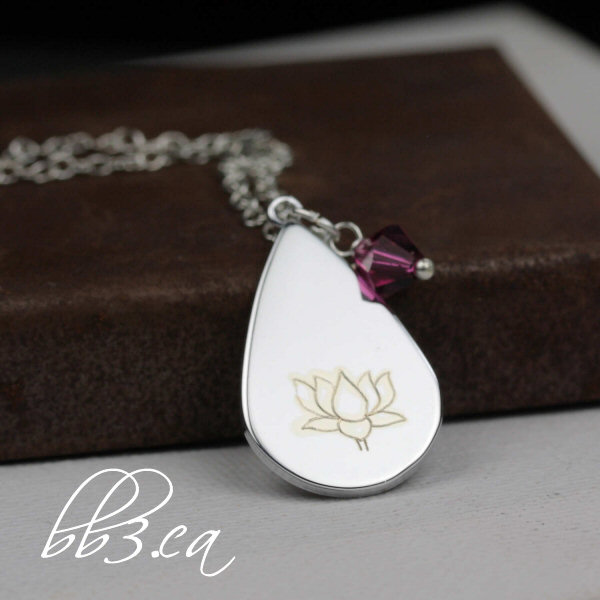
This is not a new product – but a revamping of a product I used to offer. I love the pairing if the teardrop pendant and the lotus flower, it feels so fluid & calm. I especially love to wear this necklace with a long chain. I have the silver version on a 30″ chain in my personal collection.
Available in either silver or gold, you also have a choice of either a fuschia or opal Swarovski crystal.
The lotus will symbolize different things to different people. Personally, I love any kind of flower symbolism. I am a heavenly flower/garland, afterall. 🙂 When an object such as a flower – which I think of as delicate – blooms & thrives out of murky, muddy water, this for me speaks a lot to where I have been, and what I have become. The lotus also has several stacked petals, holding an intricacy all its own: just like my own individualism.
The Buddhist & Hindu religions use the lotus in their symbolism & beliefs, and although I am not of either persuasion, I have the utmost respect for the teachings of both.
![]()
I have been combing and carding a lot of fleece this month. I’m actually squirreling away my pulled top. It’s the “premium” stuff so I am not sure whether I will make yarn with it, or sell them in batches eventually so others can spin/felt with it. I’ve actually been been enjoying spinning the “waste” product from pulling top – the lumpy bumpy stuff. Such interesting yarns! That’s a textured yarn addict for you. 😉 But that is a post for another day…
I realized I never blogged about my tabletop fleece picker I acquired last fall. I have written before how I like to hand pick fleece, but I finally conceded that I needed something that would get the job done quicker. I did not have the funds for what I’d really like (a triple picker!) nor the time/inclination to build my own so I found this inexpensive one. Above you can see the difference in fleece before and after it is picked with said picker. Note: the wool on the right is not the same color as the wool on the left. It is from the same batch, however.
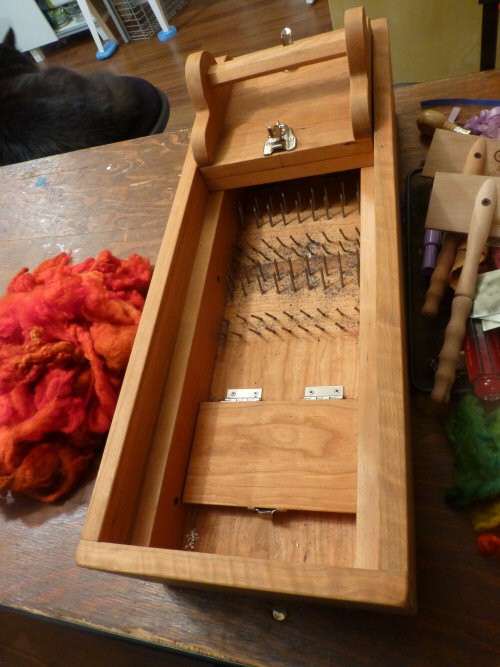
The picker has heavy sharp teeth on the bottom as well as the top piece, that slides back and forth, teasing the fleece apart; opening up those fibers so that they are easier to comb or card. I really like that this one locks in place when not in use particularly since there are many curious little hands in my house. You could even add a pad locks to it, if you wanted to.
How well does it work? You ask. It is adequate. For the price I had really low expectations so I was pleasantly surprised at how well it works. It still requires a bit of elbow grease and it’s no triple picker, but it certainly aids me into getting fleece picked faster than I could do it by hand. But someday, triple picker – you will be mine! 🙂
![]()
March 2015 Newsletter and Giveaway has been sent – you can read it above by clicking on the image as well as find out how to enter the giveaway (open to newsletter subscribers only – but you can unsubscribe at any time).
![]()
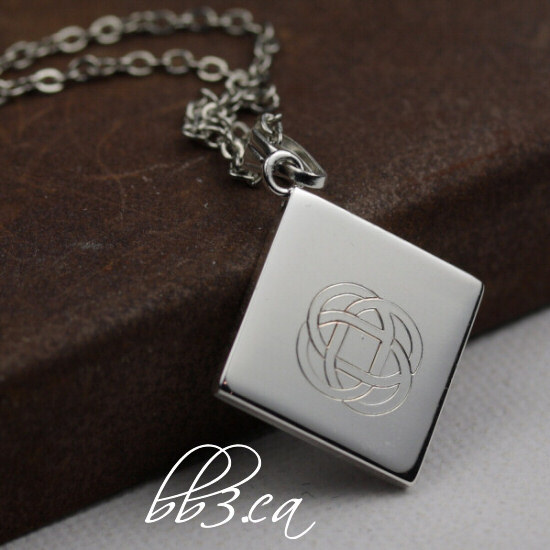
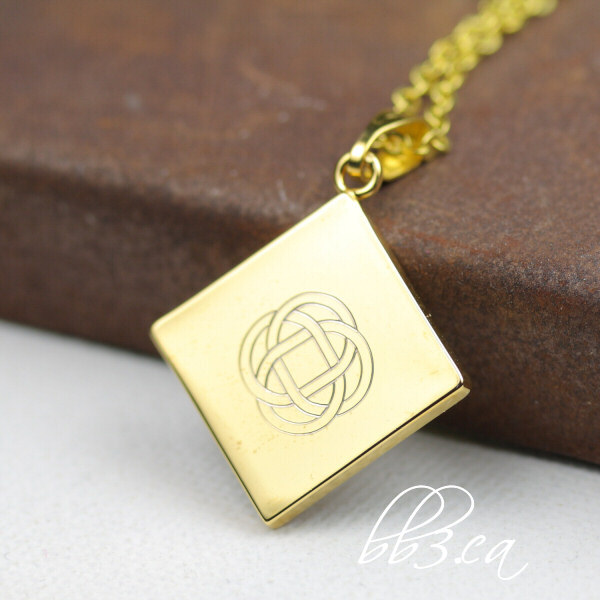
This necklace came to me the other day on a whim. I’ve had these diamond shaped blanks for quite some time now, and although I like their unique shape (as far as engraving blanks go) I could never find a design that I liked with them. With our annual spring trip to Nova Scotia coming up I had the Celtic knot on the brain. It is a common symbol in said province, and I love the symbolism of this endless knot. It just hit me out of the blue to engrave a Celtic knot onto the diamond shaped blanks.
This is definitely not my favorite design to engrave. It is incredibly intricate and if I miss a spot well, there really is no going back to fill it in. So like a maze or complicated jigsaw puzzle I have to analyze every line to make sure I have every piece connected correctly. I thought about what stone I wanted to pair with this celtic knot necklace, but in the end, I decided it looked the best on its own.
I’m really quite pleased at how quick of an idea this was. I have a sketchbook full of ideas and yet, some of the best ones simply come off the top of my head. I’m also looking forward to getting more practice engraving this mystical symbol.
![]()
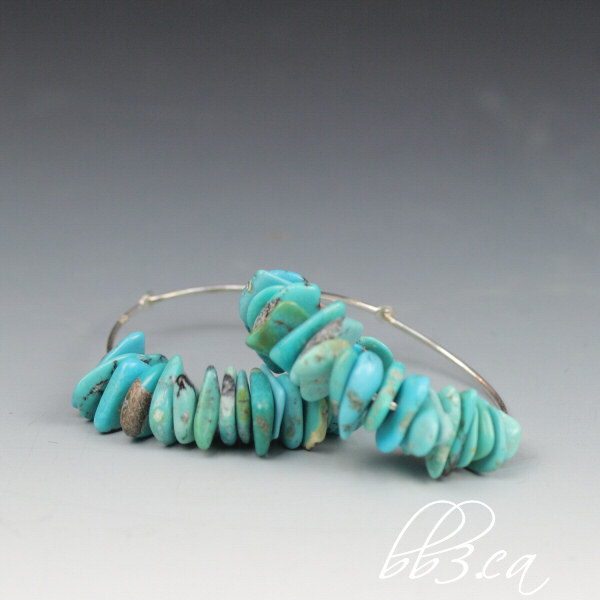
I’m going to be adding new items to the clearance section for the next little while. I finally have to give up some of this stuff. I have a huge bin of product that I made, either it was once available for sale and I took it down for some reason or another, I had plans to develop it further – or for no particular reason they just never made it up on the website (probably because I am so busy. That’s my story and I’m sticking to it ;)). For example that cute pair of earrings above is available at 40% off. Sterling silver people! 🙂
I also have items that I engraved to fill orders but they weren’t quite up to my standards so I redid them. Maybe they are engraved slightly off center, the blank was scratched up or I simply made a mistake and engraved the wrong letter. They are essentially handmade seconds. 🙂 So I’m thinking I should list these deeply discounted as well. Why waste them? They may be perfectly acceptable to someone else. Score if you can get them below cost!
I’m starting with earrings and I have quite a few pairs. Some of these I can make more of and I just might do that if they sell/time permitting. I do so much custom stuff these days it is fun to just play around with stones and beads again just for the heck of it. 🙂
![]()
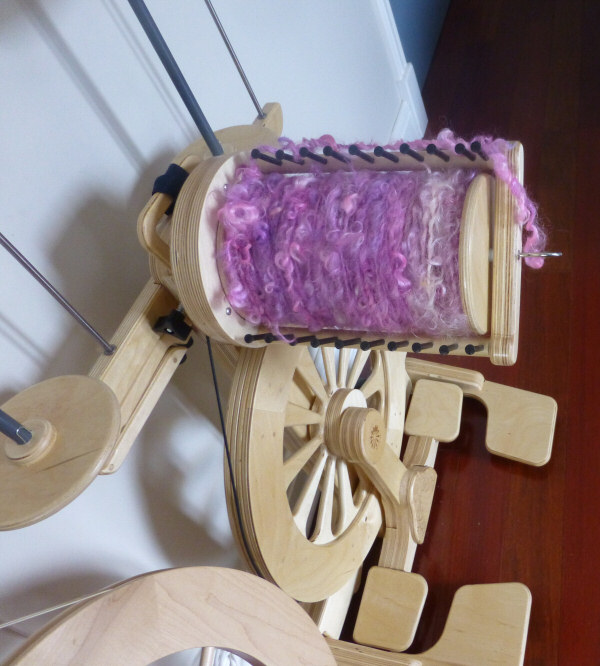
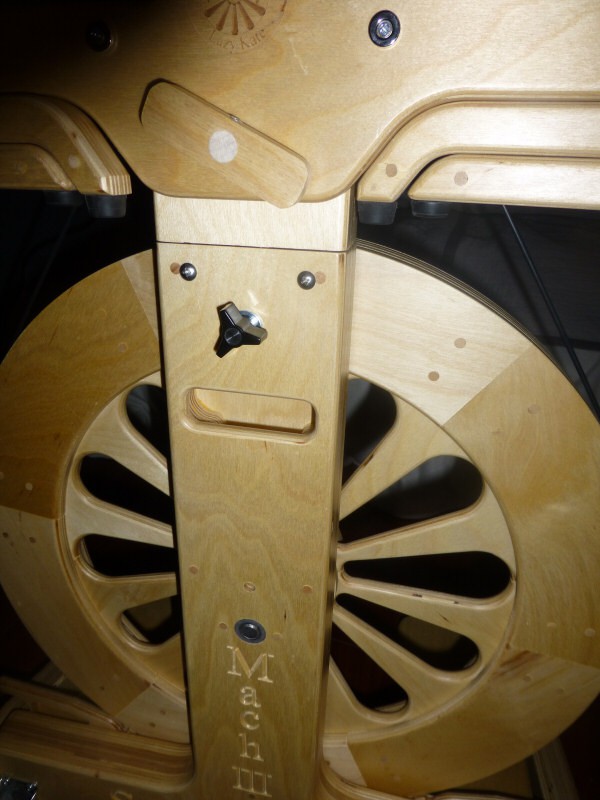
The best gift ever. DH got me a Mach III Spinning Wheel – by got me, I mean, he said “go ahead and order that spinning wheel you want”. Ha ha! So I ordered it in the New Year, and 3 weeks later, my Mach III by SpinOlution was shipped from California and on its way to my dealer in Vermont.
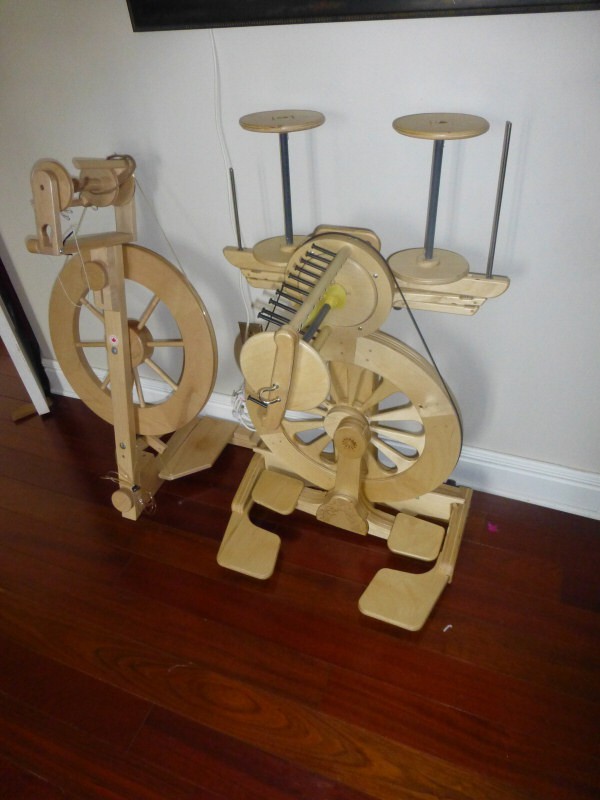
We drove down to Burlington to pick it up, and after arriving home and removing all the pieces from the box, the initial overwhelming feeling of “how am I going to put these pieces together?” was short lived. It was actually really easy to assemble! With the exception of attaching the strap to the front (which helps you move the 35lb studio wheel from one end of the room to another) – it was in a new, but totally obvious place. Thanks to Leah for helping me out with that! Putting it beside my Lendrum was almost comical – the difference in size. This Mach III is a beast and I mean that in the most affectionate way!
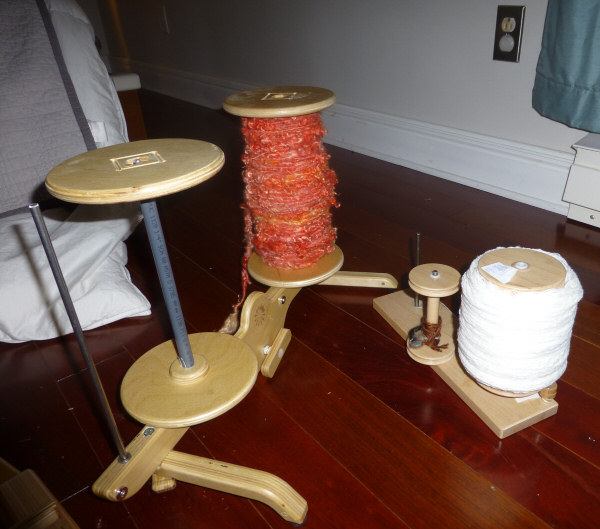
I got all the bells and whistles with my Mach III, including the largest bobbin/flyer – 32oz – you can make up to 2 lbs of yarn with it!
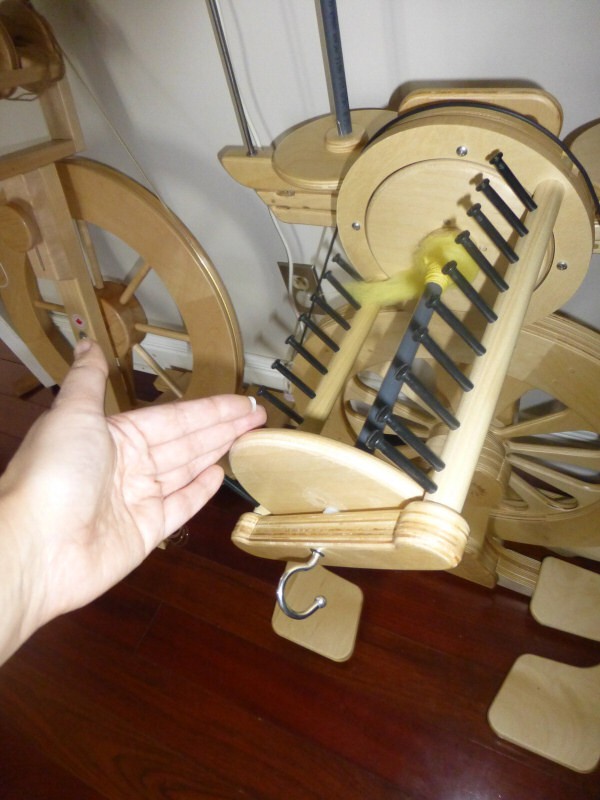
Take a peek at some of the other accessories:
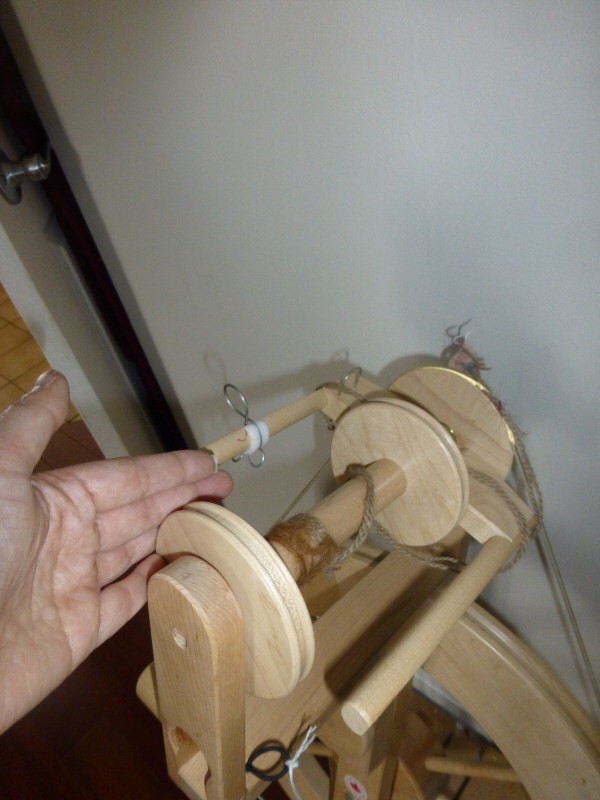
The lazy kate is genius as it attaches to the wheel as well as free standing.
This is a pretty nifty attachment. You simply treadle and the yarn winds. I need a lower chair though as I find it does brush my thighs while rotating. And, I really like my 2 yard skeins, so I still use my niddy noddy more than this. I do find with yarns with large inclusions this is a really handy tool to have.
For the first few days I had the wheel I simply played around with it. Like buying a brand new car I really like to sit and get acquainted with a new piece of equipment. I tried out different tensions (settings) and fibers before settling on a kid mohair to make into my first skein of yarn (the orange you see above). The first skein took me only an evening to make – approx. 4 hours in total. The large 2lb skein took me 2 evenings – about 3 hours each night. I was determined to fill that large bobbin and I was surprised at just how quickly it took. This is an easy wheel to use and the biggest hurdle was to get used to the bigger rotation of such a large bobbin as well as treadling much slower. This wheel is very smooth and will get going quite fast much more quickly than I am used to.
I’m currently working on a core wrapped yarn with large flower inclusions. I put the flowers together with left over handspun, felted in place and tied with a pearl bead. Very fun and so easy to do with the hook attachment & open pegs SpinOlution is known for. I really want to try the many different techniques of textured art yarns I have grown to love so that I become comfortable with the Mach III. Thus far it has been an easy wheel to fall in love with.
If you are looking for a dealer for any of SpinOlution’s products on the east coast/New England, I highly recommend Leah Rosenthal! She was on top of things giving me updates by mail and she really knows her stuff. You can find out her details on the SpinOlution website under Vermont, and be sure to checkout her blog.
![]()
The February 2015 newsletter was released to inboxes last night. You can click the above image to read whats new, see who won last month’s giveaway and of course, see what is for up for grabs this month.
![]()
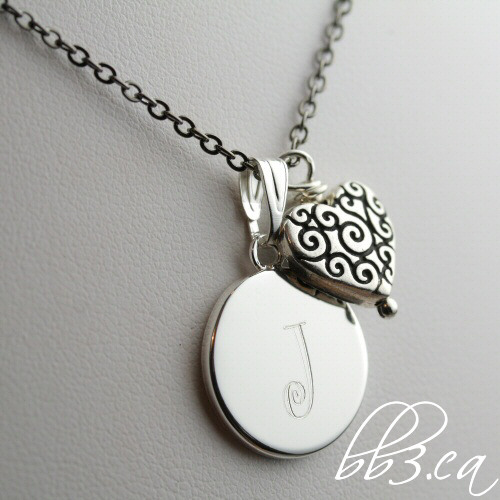
My new product for the month of February is a Personalized Sweetheart Keepsake Necklace. If you subscribe to my newsletter you may have received this necklace as a thank you gift sent out to subscribers last April.
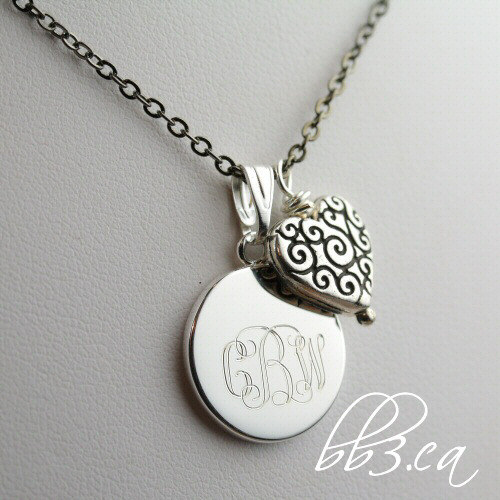
You can choose 1 or 2 initials in the curlz font or a monogram. I think initial + sign and initial in script font would be a nice idea for a gift as well (A+B) although I don’t have an example of that to share, yet.
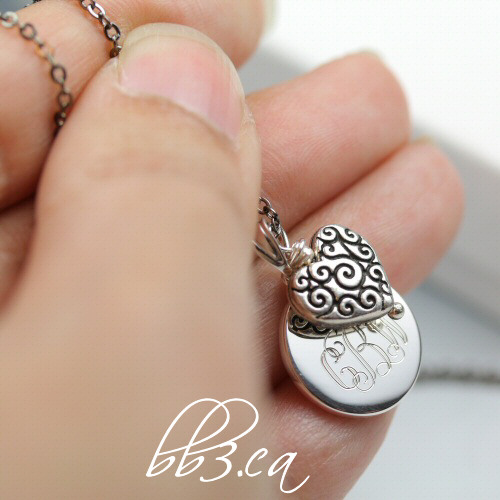
The heart is a culinary grade pewter & the chain is lead & nickel free. The engraving blank itself is a silver plated brass. I love the weight of these blanks. I have yet to play around with my sterling silver disks I purchased around Christmas time. Never enough hours in the day, to balance time with my family, their creative pursuits, and my jewelry & fiber projects. It is the life, however! I’d rather have many things to do/explore than nothing at all.
![]()
January always means a time of renewal, growth & reflection for me. So it’s good that it is also the slowest month of the year for me sale wise. I tend to go through old designs to decide whether or not I want to keep them or finally put them to rest for good in January. I have a bin of “for more consideration” jewelry pieces in various stages of design. Something just does not feel “right” about them so I set them aside until I can examine it more throughly. I think many people assume that all I have to do is assemble a few beads together and list them online, but it is a more involved – sometimes even cathartic – process for me. If something feels “off” I simply will not share it with the world. Maybe it is an issue with the flow, overall look or just with the pricing or placement. It seems awfully involved for my designs that these days are very simple and streamlined, but I create not to encourage others to spend money. Creating means so much more than that to me.
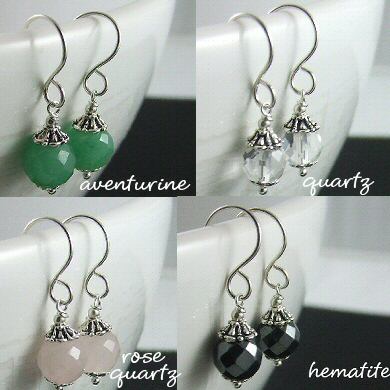
In the case of these simple gemstone earrings they were offered a few years back when I only had an Etsy shop. Then the price of silver went up significantly and the price point bothered me. I designed these earrings with add-on, event or “thinking of you” in mind. Something inexpensive you could buy in bulk to give as shower gifts or to your wedding party – or even in gift bags/party favor. Maybe you want a small gift for a colleague or just need an inexpensive “thinking of you” gift. When they started to get over the $20 mark, I simply lost interest in offering them.
I recently got these really nice stainless steel french ear hooks in stock. They have a wonderful detailing and are a fraction of the cost of sterling silver. So I plugged the pricing into my spreadsheet and the material cost was significantly less.
I’m currently offering these cuties at the price of $13 a pair! They currently come in 8 different stones and if you buy multiples, I can give a wholesale discount. Drop me a line to discuss.
![]()
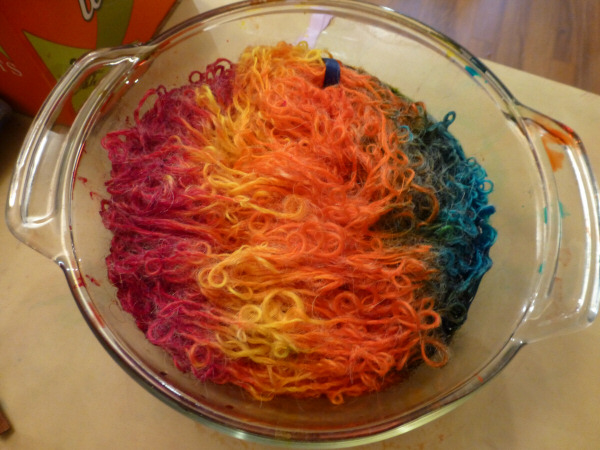
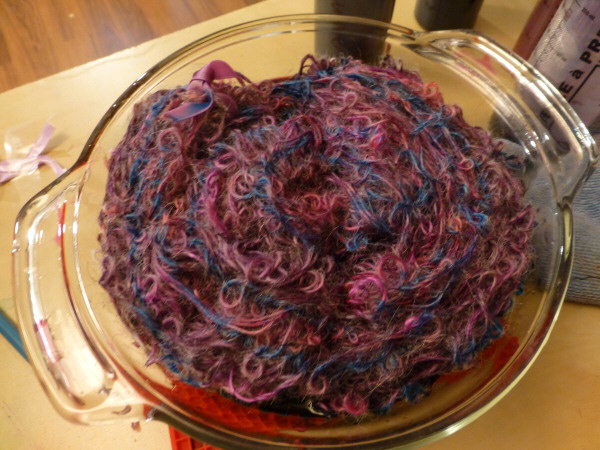
Here’s a closer look at the dyeing process from the post Handspun Bouclé: A Closer Look. This is only one technique I use for dyeing animal fibers. This one is super easy/quick with minimal set up or equipment required.
This is my technique for dyeing small amounts of fiber, & it worked well for one skein of yarn. I use an old glass corningware – dedicated to dyeing only, not food – that fits my smallish studio microwave. This microwave is dedicated to crafting only – never used for food. In fact, we don’t even own a microwave for food!
The term “acid dye” sounds really toxic and menacing. But it actually refers to the product used to bond the dye to the fiber. A mild acidic agent is used, normally citric acid or good ol’ kitchen vinegar. Acid dyes are non-caustic and very safe to use. You can even buy dyes such as “Greener Shades” that guarantees no heavy metals, although I have heard criticism that that is a rather trumped up claim since acid dyes normally don’t contain heavy metals. Either way, the piece of mind is there and I have used Greener Shades in the past and enjoy their color palette.
I prefer using citric acid over vinegar. I have found that the color seems to absorb and adhere better to the fiber than vinegar. Which means more vibrant colors and less dye down the sink during the rinsing process. Although admittedly I am getting a better feel for vinegar, due to the fact I had run out one day. It is more readily available in large quantities – you can buy it in bulk at Costco. My citric acid I order online in bulk for the best price.
For this particular technique I use low-water immersion. Meaning, there is just enough water to barely cover the yarn. I add either diluted/dissolved citric acid in water or add vinegar to the water. The skein of yarn is carefully placed in the glass bowl, either in a spiral or accordion fashion. I already tied off the yarn in 4 places with ribbon to discourage tangling. Then, I apply the dye via salad dressing bottles bought from the dollar store. The dye comes in powder and I mix it with water ahead of time. I literally squirt on the color!
The yarn was soaked ahead of time in warm water with a little synthropol, which is a liquid soap that helps open up the yarn fibers to receive the dye. I then cover with saran wrap and will microwave on high at 5- 7 minute intervals (I’ve gone up to 10 – 12 minute intervals for bulkier amounts of fiber).
If by 10 minutes the color is not entering into the fiber I will add a little more vinegar or citric acid to the water. Then microwave again. It depends on how many times this happens. The goal is for all the color to be absorbed into the fiber leaving behind clear water.
Upon doing this several dozen times, I noticed something interesting. When the water was clear the saran wrap was sucked down into the bowl like an air tight vacuum. The first time I witnessed this I had a heart attack thinking the plastic had melted all over my fleece. But instead it was a perfect dye – water was clear in bowl and no dye escaped when I rinsed it under hot water with a little Dawn dish detergent. Now I continue to microwave in intervals until I see this phenomenon. Then, I let it rest for another 5 minutes before taking it to the sink to rinse.
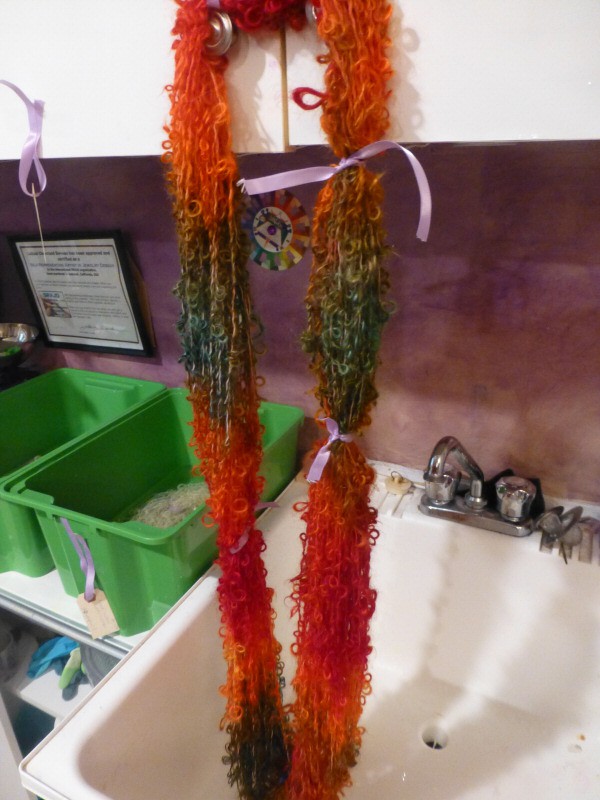
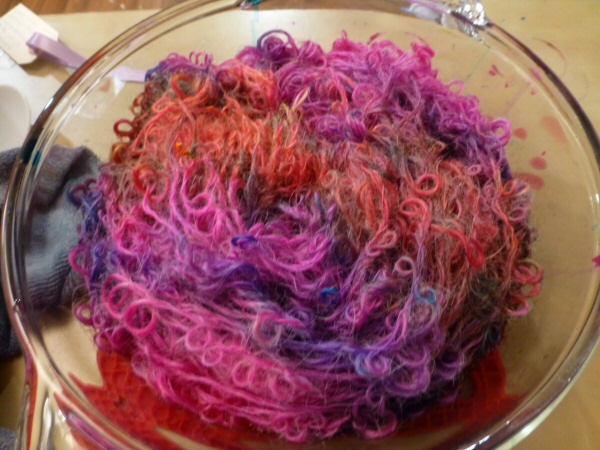
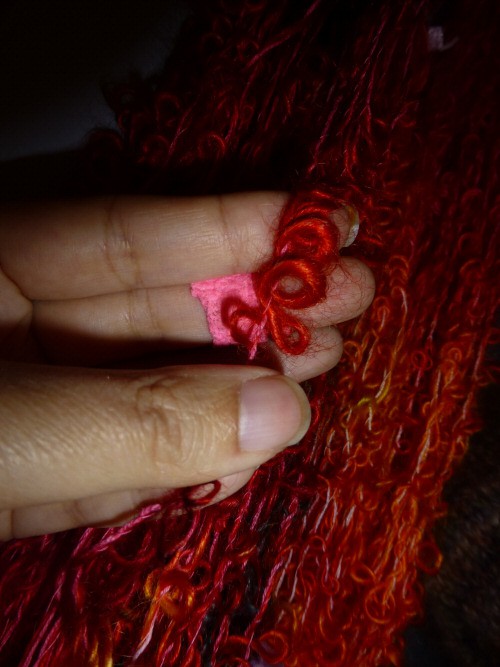
Dyeing seems like an incredibly daunting task until you do it. Then you are amazed at how incredibly simple and satisfying it is. Still, I have a lot to learn with just one year of dyeing fiber under my belt. I need to work on knowing the best combination of colors so not to create a “muddy” color, which I dislike (see the pic above – brilliant oranges and reds, but I was not happy with the turquoise/greens – very dull/muddy. I did remedy this somewhat with a quick overdye to the darker areas. Perhaps another blog post on that technique is warranted). The good news is it is a terribly satisfying practice where the possibilities are as endless as your imagination. And if you don’t like the results, you can always over dye – which gives you a whole new set of results and colors that could blow you away.
![]()
Happy new year! January 2015 newsletter is unleashed. You can read it by clicking the above image. So cool to be sending a necklace to Romania – the winner of last month’s giveaway! This month I am giving away a pair of sterling silver gemstone leverback earrings. You have to be subscribed to enter. Details in the newsletter.
![]()
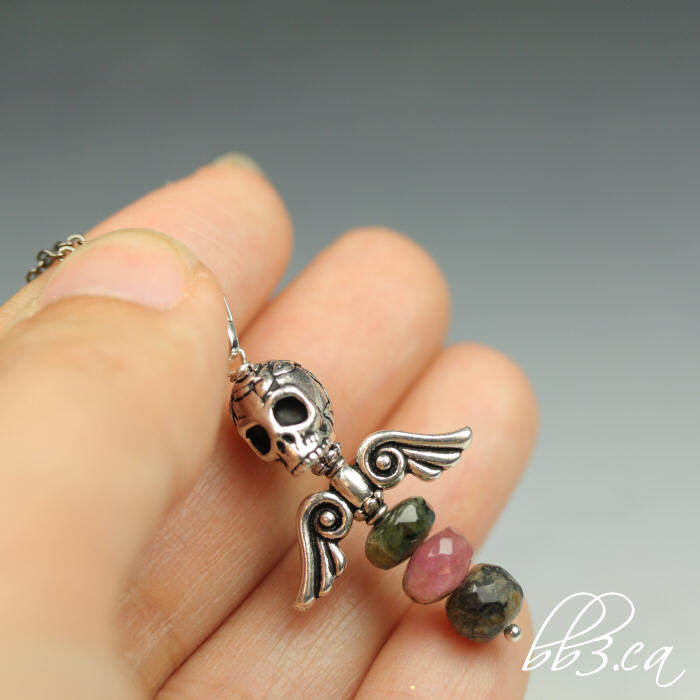
A dear friend of mine requested the “dark angel” necklace in tourmaline for her daughter. I was surprised how hard it was to find faceted rondelles the right size for this piece, I was finding only teeny tiny beads. I know tourmaline can run on the expensive side compared to other gemstone beads but sometimes I get frustrated trying to find supplies in this country. I finally found a supplier in the US thanks to help from my jewelry group. Although these rondelles run smaller than the beads featured in the other necklaces (these are from 6 – 7mm in size) I still think it works just fine.
I absolutely love tourmaline and I’m happy to finally add it to my complement of beads.
![]()
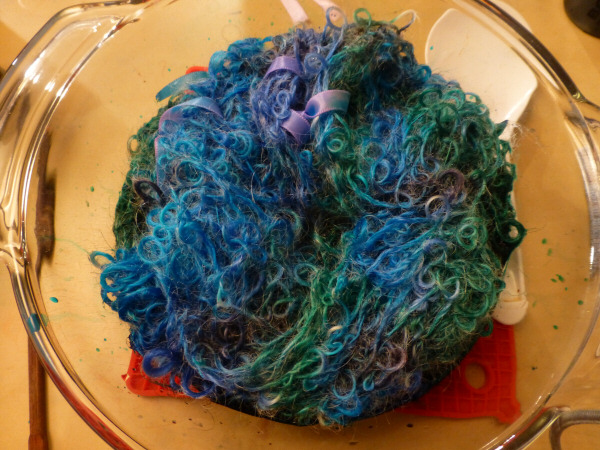
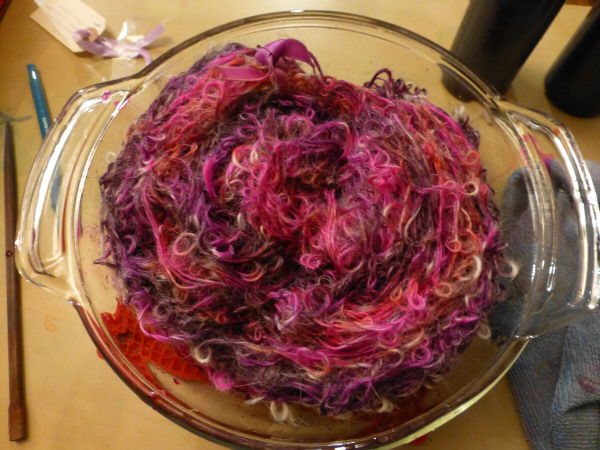
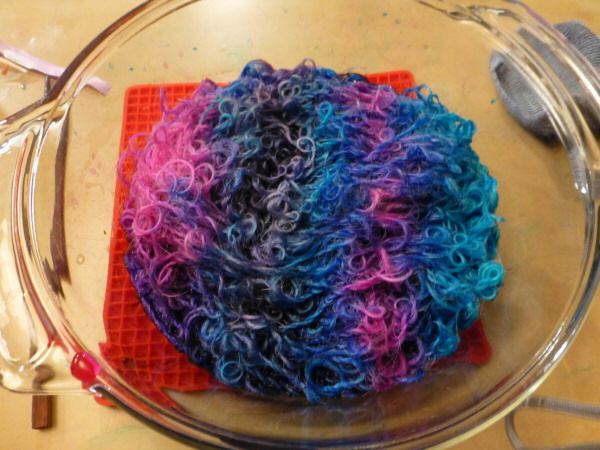
Back in November I blogged about spinning bouclé yarn for the first time. I loved the technique so much it lead me to experiment with other fibers other than mohair to see what the end result would be. Here are some closeups of the finished products.

The above photos are all mohair. I dyed these after the yarn was spun, and will do a post about the dyeing process soon. I am really growing to love dyeing both fleece and yarn.
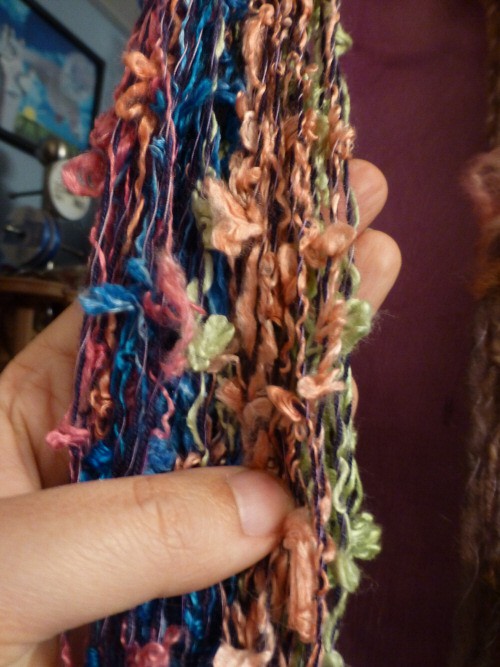
So this was interesting. I spun some silk and then looped it as a bouclé on some handspun alpaca. After it was finished, I washed and fulled it (a process of shocking the yarn with hot/cold water so that it felts a little bit) and regretted it! I loved how it looked straight off the wheel, but thought it really lost a lot of its character and looked rather clumpy after the fulling process. Now that it has been hanging up in the studio for awhile, I am intrigued with it. Hopefully over winter break I’ll have a chance to knit it up & see what it looks like.
Alpaca makes a really nice bouclé, too – very similar to mohair. I finish plied this with handspun silk and it looks so yummy against the dark alpaca fiber. I just wish I could have gotten a better picture of the entire skein, it was hard to do since it is so dark. I’ll definitely share once I have it knitted up in something.
I’m definitely bouclé hooked. So many ideas! I’m taking a break from that to do some core spun yarns which I will share more about in the New Year.
![]()


I’m closing the studio for a much needed break. I am around to work on orders if they are not of a time sensitive nature, so do shop away if you are finding the urge over the last few days of 2014. I cannot guarantee my usual quick turn around, however. I will be taking this break time to work on new designs and catch up on blogging.
Catch you in the New Year!
![]()
The December 2014 Newsletter is available. This month we are giving away a customized flower engraved necklace. You can read all about it by clicking the caption above.
I can’t believe another year is coming to a close! Looking forward to 2015…
![]()