

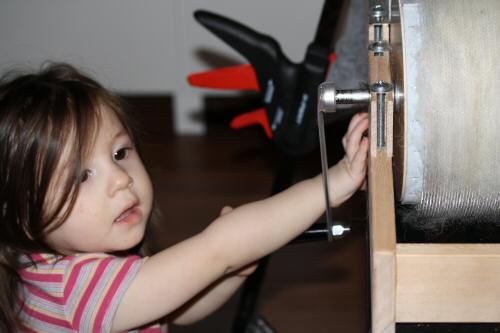
My youngest decided to try her hand at drum carding today… 🙂
![]()
My youngest decided to try her hand at drum carding today… 🙂
![]()
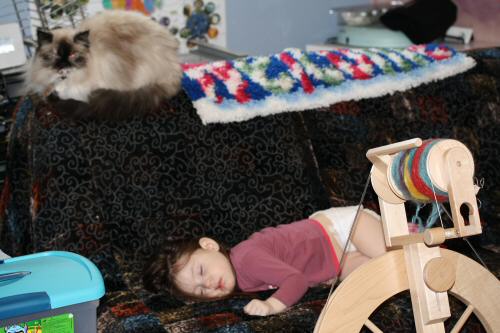
Today while I work, the others relax (it’s a comfy space – I don’t blame them!). 🙂
![]()
I’ve been quiet as of late, & that is because last week I finally decided it was time to upgrade my camera & invest in something less automatic. I have been using a digital point-and-shoot camera for 4 years now, & it has served me well. However I felt very limited. I wanted to be able to customize more, and also achieve true macro photos, rather than ” macro” (close ups) with a telephoto lens. I wanted to get more detail in my photos; that 3-D effect you see with a true macro lens.I also found photo taking time consuming, as I would have to take several shots, then download them onto my computer, sift through the different angles and choose the best. Time is money. Being able to take a decent picture the first time, crop & go would be heavenly! Especially with the amount of jewelry I have been making lately.
So I assessed my needs. I knew for my budget and experience I wanted something relatively entry level as far as ” pro” style cameras were concerned. For me that meant being able to add a macro lens. I needed speed & ease of use. I needed something I could learn quickly & start taking decent photos right away without much of a learning curve, but still be able to customize.
So I narrowed it down to the two main players. Will it be Nikon or Canon? In the end I decided on a Canon camera specifically because it comes with computer software (Nikon has software too but you have to purchase it separately). Computer software means – you can control your camera & shoot your photos directly to your computer – which is a huge time saver!
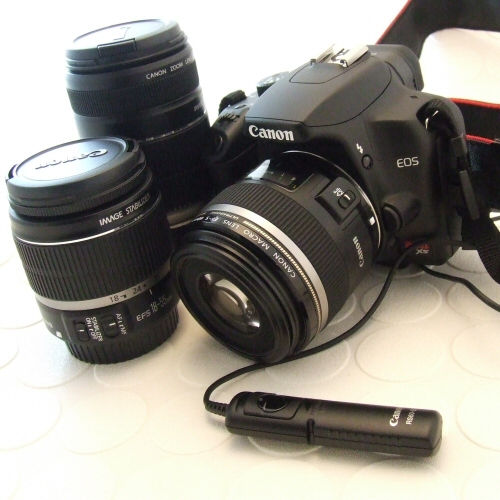
The other reason I was sold on a Canon is because Costco sold them. With Costco I can return the camera with no questions asked, so if it didn’t meet my needs it would be easy change. Also Costco products come with a 2 year warranty with my membership. For my budget, Costco had the Canon EOS Rebel XS and XSi series. The difference was about $200 on the price. In the end I went with the Rebel XS as I wanted to have cash for accessories like a macro lens & a remote switch. I figured a sacrifice of megapixels for a great lens was worth t.

Costco sold both cameras with an add-on package which included a bonus lens (comes with both EF-S 18-55IS and EF-S 55-250IS…I guess “IS ” is a relatively new technology for them that stabilizes the lens to compensate for camera shake) & camera bag. The macro lens and switch I bought from a local camera store. The switch is great because you don’t have to worry about moving/shaking the camera when you press the shutter, but honestly I’m not using it as much as I thought I would since I am controlling the camera from my computer. Still a handy accessory to have.
As far as the macro lens goes, it was a painful decision for me. I knew I wanted the 100mm macro lens, but it was a hard pill to swallow cost wise – more than the price of the camera. So I decided on the 60mm lens: EF-S 60mm f/2,8 Macro USM. It was roughly the same cost as the camera, which was easier for me to live with. I have to be closer to my subject to take the photo but it still photographs wonderfully and the motor is whisper quiet.

This is my old camera…good ol’ point-and-shoot Fuji Finepix. Bought for approx. $300 CAD 4 years ago. Served me well and we will still use it as a back up camera.
But how does it do for taking pictures, you ask? Is it really worth the investment? Keep in mind, I am still learning. But I am impressed by the results despite my limited knowledge of camera settings.

The one on the left is taken with my Fuji camera. That is about as close as I could get to the piece, and about as white as I could get the background without ” photoshopping” . The one on the right is with the new Canon Rebel camera, absolutely no cleaning or tweaking of the image. Taken by someone who didn’t know what the heck they were doing. The macro lens was pretty much fresh out of the box here. I immediately fell in love. 😉 I’d say not bad for straight off the camera. I know many would argue it is washed out – that is a camera setting thing – I personally like the artistic merit of the image in this form.

Here’s my set up. My old laptop is controlling the camera. 🙂

I think my only disappointment is that there are some tools in the software unavailable for the XS and XSi series that the higher end cameras have the ability to do (like setting custom white balance). I guess that means upgrade in the next few years. 😉
Read about my other new gadget that I love: The Nook on my other inspired blog. 🙂
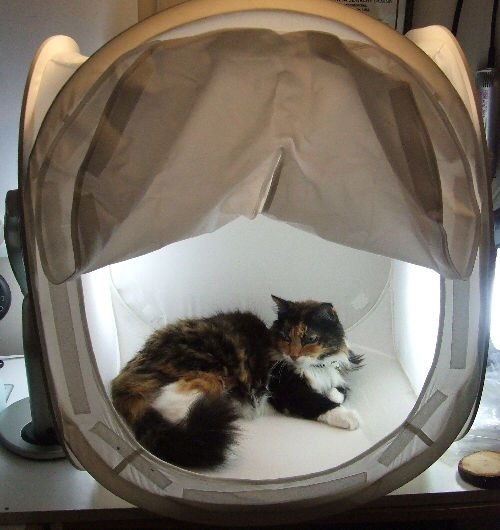
I step out of the room for a brief moment, and look who found a new nap spot:

Before I assess the mound of jewelry to be photographed you plowed over, the tools you knocked off the table, and the amount of hair I will now have to delint…

I might as well get some nice shots of you. You are after all, in the photo box!!


That’s the Zany cat – 13 years still ticking & boldly going where no cat has gone before (because the other two are scared as to what I’d do to them if they attempted this!). 😉
All in a day’s work. 🙂
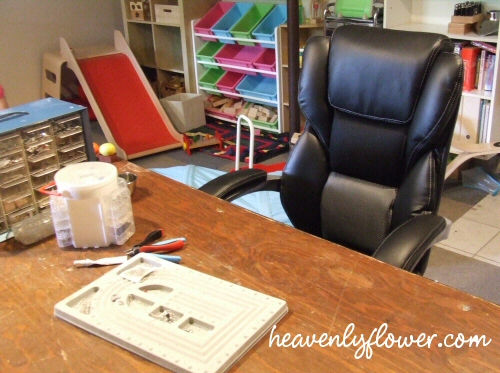

So the other day I was at Costco and broke down & bought myself a “proper” chair. I’m not sure exactly what a “proper” chair for jewelry work would be – before my house I was an apartment couch beader, so it’s all new to me.
All I know is, the chair I was sitting on previously – which was lovely by the way – handmade by the previous owner, sturdy and high backed, was still a dining room chair meant to enjoy meals with & not sit for long periods of time hunched over an engraver or beads.
So this was not too bad, $100 plus an instant $20 rebate. It is definitely comfy. My legs don’t fall asleep anymore, and if I lean back while thinking or doing certain kinds of work it is great. But there is still the problem of leaning over to do accuracy work. I still get pain at times in my middle back/between my shoulder blades. Hubby thinks I need a lower desk – I am using a flea market table due to its large size – but then wouldn’t I be hunching over more? Sure sitting on a yoga ball would probably be the best for my posture but terribly impractical – can you imagine – pliers in one hand and jeweler’s glue in the other – yeah, I see an accident waiting to happen. 🙂
So this will do. For now anyway. What is your work bench set up and how do you find it?
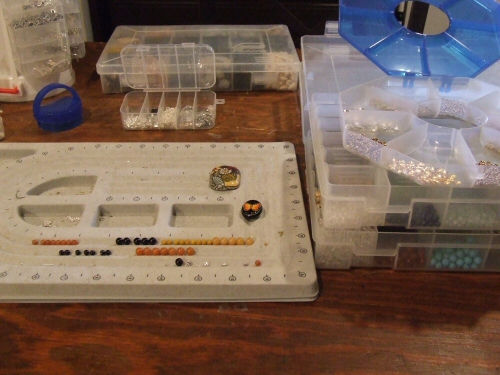

I haven’t done any beadwork in quite awhile since I have been teaching myself some metal techniques. Today I brought the beads out again in order to work on my Artbeads Blogging for Beaders Project for Summer.

I doubt I will finish both pieces today…actually I know I won’t, esp. since this beautiful weather is calling me outdoors!

I have to admit something: I have WAY too many supplies. I am serious!! Not exactly a bad thing – but over the past two and a half years, I seem to have had more time to BUY beading supplies than MAKE jewelry! Plus I scope out suppliers, buy wholesale and volume discounts and close outs – well, you get the picture. When I sat down to look at colour options for these two necklaces, I had too. many. choices.!! In a way it was overwhelming – too many possibilities! I spent a half an hour this morning just looking & considering colour schemes!! I came to the conclusion for example, I have way too many gemstone beads in the hue of ORANGE!! I went to get large guage headpins and paused to consider dozens and dozens of different metal components. And I am organized – believe you me – it’s just too many choices staring at me. At this point, I think I could open a small store…if I had the time! HA!
Anyway, I mean that somewhat in jest of course – but still…anyone else feel the same way – even some days?? The possibilities are endless when it comes to beads…I thought I was limiting myself by not buying glass anymore but nope… 🙂
Happy Creating! I should be posting this project within a couple of days…

The creative madness (um, I mean, magic…) unfolds in my head. But I have never in the 10+ years of jewelry making & paper crafts had a proper work area to transfer those ideas into the tangible world. I’ve always lived in apartments for my whole adult life; and when we bought our house 3+ years ago, two children have been born since so I have been working from the kitchen table. 🙂
As summer drew to a close and my youngest was gaining independence, I decided it was time for a proper workspace. But what would work? Where? I needed a place that I could multi-task: make jewelry, fill orders & prep them for shipping, take photos (I was so sick of setting up and tearing down my photo box), and also work on my other creative endeavours which include cosmetic making, paper crafts, candle making…on top of this, I needed a way to keep the girls occupied while I work. So the space would also have to act as a playroom.
Upon pondering on my open-concept home, it became clear that one room would be perfect: the laundry/mud room.
What? You say. A laundry room. Sounds silly doesn’t it? Here is where ” outside the box” creative thinking is key.
Our laundry room is very large. In the initial plans for the house, it was supposed to be three smaller storage rooms and an exit to the garage. Thankfully, the original owners opted to make it one large back room. Prior to last August, this room served as a laundry room and very large bathroom for my cats; and because the kitty litter was there you really did not want to spend a lot of time in it, let alone have babies crawl all over the floor.
My husband had plans to move his computer gear into that room as well, so a plan formed. Cat litter was moved out of the room entirely. One side would be set up with carpet tiles so the girls could have a play area. The other side, my desk/work station. The room was already equipped with lots of cupboard space and counter space which would house all my creative products. And bonus – I could also get the laundry done as well! Perfect solution for a busy mom who rarely made it down the stairs to do the laundry…
In October we set up the space; and I did some more organizational arranging last month when I realized I was going to take a jewelry sabbatical.
The space esthetically is nothing to shake a stick at: I do hope to do some painting and refreshing in the future. Functionally however, it is a dream come true.

Above is a view of my main workspace. We have three of these flea market tables and one works well for a large work area. The other desk/cabinet was here when we moved in; not great looking but it’ s free and functional! You can see my shipping materials in the hanging file above the table. My light box for photo taking is in the middle and that small fridge at the very left keeps any cosmetic concoctions or supplies that need to be kept cool (and my husband’s beer!). See those two carpet tiles missing at the top left of the carpet? Spilled beer. Sigh. They will return after we can get the smell out. LOL!
The fridge sits on my cart that holds my “hardware”: metal working materials, polishers and all of my engraving fonts. I also have a printer that comes in handy when I am not at my usual computer.
And of course…my daughters’ toys…they never stay in one area. 🙂

The above view is of the entrance to the room. My work area is directly behind me. You see my oldest on her slide on the right. My washer & dryer that I adore; and the cupboards above are great places to stash my supplies for making cosmetics, their packing materials and misc. supplies such as mixing bowls, the ever useful Popsicle sticks, etc. That blue thing on the floor is a tunnel in case you are wondering. Endless fun for babies. 🙂

A view of the play area. There are lots of baskets and bins to store their wooden blocks, musical instruments, and pretty much any toy that I don’ t like to have under foot in my living room. 🙂 That cupboard is where I keep my beading supplies and craft paint; we’ll get a peek inside shortly.


Inside my jewelry cupboard…at least the beading side of it…still room to grow! *grin* It could be neater but it will do for now.

My very useful “built-in” bookshelf that holds paper, books, jewelry (those two large binders on the right of the third shelf houses my completed jewelry ready for shipping), my engraving plates and charms in metal and wood, and that wooden case is where I keep my hole punches and rubber stamps.

I found this scrapbooking cart at Costco awhile back & although I do not scrapbook, it’s handy for holding all my decorative paper! On top is my Provo Craft Cuttlebug.

The room also came equipped with ample counter space. Here in one corner is my microwave for flower pressing & melting soy wax for candles.

Above the microwave you see my main cupboard filled with cosmetic making supplies. I haven’t delved into making mineral makeup as of yet; just soaps, lotions, scrubs, lip balms, etc etc….

This is a fairly messy end of the room…but I wanted to show two of my three pantograph engravers….my husband’s computer gear is to the left of them (that’s our router stuck to the wall) and recycling bins underneath…it’s a hot mess at the moment so I’m only showing off the engravers. 🙂

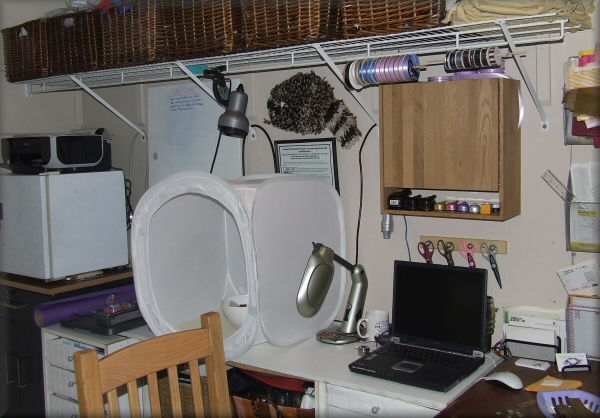
Here’s a closer look at my workspace…the wicker baskets above hold remnant fabric, candle making supplies (mostly holders), extra shipping materials, and packing supplies. I use my old laptop downstairs if I ever want to look up something on the internet or get info off our server. That little box on the wall was a great find! I forgot to take a photo of the inside…but I got it at Ikea for half price. It is supposed to hold CD’s, but I keep my inks, pigments, embossing powders, glitter & stamping pads in it. Robbin is kept neat & accessibly hung on dowels and wire off the top rack.
(That hook rug raccoon was a creation of my late mother’s when I was a child. It always makes me smile to look at it).

This little photo box was such a great, inexpensive investment! I still believe natural light is the best light for photographing jewelry, but if I waited for great weather to take photos outside in this climate I would be unable to take photos year round! My photos still could use work but they have improved dramatically since buying this light box. Underneath I keep props for photos as well as other jewelry making materials.

It’s always great to have a whiteboard to stay organized and brainstorm! Mine is under-used this month; I must remedy that next month.

Thanks for taking a peek at my workspace…it may not look like much, but my girls & I love to spend our time down there. Hopefully it will inspire you & your creative space however big or small!

I happen to live with 4 jewelry “thieves”. One comes in the form of a pint-sized little girl with chubby little fingers; the other are the 4-legged furry variety. I don’t get what the temptation is for babies & cats to touch exactly what it is you are working on at the moment. It doesn’t matter what I give them as a distraction; as soon as the jewelry gets laid out for that perfect shot, a cat lays across it, bats it across the floor, walks into the shot or my 16-month old picks it up just as I am pushing down on the shutter. It is so nice to have so many admirers of my work under one roof. 😉

Mind you…sometimes cute little feet in the photo works!
