Racing Stripe

022

Snapped this quick (read: terrible) picture of a single ply racing stripe textured yarn, still on the wheel. Inspired by Jacey Bogg’s technique in her book & DVD Spin Art, this is bluefaced leicester with a racing stripe of both handspun one ply wool and metallic thread. The picture does not do it justice of course. I wonder what to make with it. Spun on my jumbo flyer so I have a decent sized skein. Hmmmm…. 😉

Thick & Thin…

Thick Thin

Sorry for the terrible picture…this is my first attempt doing a single ply thick/thin yarn using Jacey Bogg’s wrist flick/turn-key-in-lock  method as she describes in her book/dvd Spin Art. I absolutely adore this book & accompanying dvd, and although my yarn is not perfect, I was encouraged at just how nice it actually *did* turn out. I think the biggest testament is that it drapes nicely. Single plies can never be balanced as it does not contain any counter twist like a plied yarn, so the goal is to achieve as even a drape as possible. If your yarn hangs fairly straight after washing/fulling, then that is a good “balanced” single ply yarn. I don’t tension my yarns either, simply let them hang dry after a good thwack or two. 😉

This yarn is a superwash merino which is a first for me. First time spinning a thick/thin, and using superwash. Not a fan of the smell of superwash wool (chemically treated so that it will not shrink/felt). I like the fresh barn smell of sheep fleece (unlike an unclean barn smell har har! ;)). We live in a virtually chemically free home so smells and odors particularly of a chemical nature seem very strong to me. I think I will stick to untreated fleeces and care instructions if I ever gift any yarn or knitted/crocheted pieces. Merino itself is a very good choice for thick/thin yarn since it is short stapled; therefore the short movements created to make the fibers “catch” in the thin section are easily achieved unlike in a long stapled yarn you wouldn’t get as much variation in the thick/thin.

I’ll be sure to post what this looks like knitted up, however it may be awhile – I don’t see me stepping away from the spinning wheel anytime soon… 😉

Rhinebeck 2012

9 Rhinebeck

So excited to announce I finally got to go to Rhinebeck this year! I have been wanting to go to this show for several years now, and the gorgeous weather was one of the deciding factors to take off and go last minute (we even got the chance to spend the night in Manhattan making this the perfect trip for me. I love the country, but adore that city – the creative energy!). I picked up some great raw fleece at the fleece sale (the most organized I have ever been to I might add) as well as a few other goodies – check out my bounty!! I will be posting all about the show on my family’s blog; once it is completed I will post a link to it here! Can’t wait ’till next year! 🙂

Fiber Experimentation

Yarn Experiment

From left to right: mohair, mohair/wool mix, colorfully dyed llama, brown yak down & angora/wool mix.


I’ve been going through my fleece bins ans spinning/plying yarns from different fiber sources. I want to get a feel for the different fibers so to determine what I would like to continue to spin on a larger scale in the future. So far I have enjoyed every type and learning the pros and cons of spinning each. It is going to be hard to narrow down. 🙂

Spinning Yak Down

7 Yak

This summer I purchased a small bag of yak down to try spinning. It is amazingly soft/fluffy/airy and short stapled, so a light touch is definitely needed as well as a very short, inch-worm type draft. I put my pulley on medium with a soft uptake (my Lendrum is a scotch tensioning wheel). I found the large pulley didn’t give the enough twist so the fibers drifted apart easily which would be annoying during plying. I really wanted to keep that light airy feel in the finished yarn. The finished project in another post…

Spun Recycled Silk

6 Silk

Frabjous Fibers has these awesome bags of recycled silk bits…some long, some just tiny chunks of many different colors. It spins up in this wonderful bumpy texture – kind of like when you tail spin wool locks only much finer. Spinning takes a bit of skill because you do have to inch worm draft quite carefully. Once you find your groove however, it is so much fun to spin and the texture is so rad! I have plied this with wool and it adds a wonderful softness and fun color texture. I’d like to card this together with some wool…another reason why I so need a drum carder! 😉

Leclerc Bobbin Winder & Storage Bobbins

081

Spinning so many singles means my handful of bobbins for my wheel just isn’t cutting it anymore for storage. Upon doing some research, I was happy to obtain a bobbin winder and 2 dozen storage bobbins from Leclerc Looms here in Quebec. I purchased their larger size styrene 4in spools, not the typical boat shuttle spools that are too small to hold much yarn for plying.

The winder is a simple heavy duty tool that I am really glad I bought. Not only is it faster than winding off by hand, it winds nice and even, and not too tight as I find the case with hand-winding. I have it screwed to this side table for my rocking chair in the livingroom for now until I move back into my studio again. What can I say it does the trick. 🙂

Making Handspun Yarn – the Tools Involved

133

I have been having a fabulous time learning all about spinning since purchasing my first spinning wheel in February. I’ve been spinning wool roving mostly from my collection of roving by Bartlettyarns obtained from the New Hampshire Wool Show last year (they had a buy 4 get one free sale…or something like that. At the time I had no idea I would learn to spin; I simply stocked up because it was a darn good deal and you can never have enough wool roving for felting :)). It’s very light and fluffy and I enjoy the texture it creates once spun. I am still waiting for the plying head/jumbo flyer I ordered for my Lendrum, so for now I have been spinning and storing my singles…for the most part anyway. I also have been experimenting with plying just to get a feel for it (you can most certainly ply with the regular head you just get less yardage).

I own two lazy kates and I use them for storing my bobbins when I am not plying. I tend to get bored spinning one color so will switch it out for another fairly often. I watched a wonderful video called “The Gentle Art of Plying” by Judith Mackenzie. Judith calls these marvelous contraptions just “kates” and I chuckled because I agree with her – how can you call something so useful lazy? When she made this remark in her video I was nodding my head in agreement! If you are looking to understand more about plying and a good method to do it, I highly recommend her video. It certainly took the intimidation out for me. I even tried plying cables. It is a whole lot of fun and really addictive. I think once you understand twist and counter-twist (S and Z as it is called in the spinning world) plying is not so intimidating. I always thought I would only make fun bulky singles, but I am really loving plying and the balance created in the finished yarns.

A niddy noddy is another useful tool with an entertaining name. One you have finished plying your yarn (or spinning your bulky single yarn as it may be) you wind it onto a niddy noddy. This helps straighten the fibers as well as a tool to count how many yards was made. For my particular niddy noddy, I count the wraps and multiply by 1.5 to get the yardage of yarn made. Winding yarn on a niddy noddy takes a bit of skill and this is where my jewelry making experience really help me out. I have heard of people who, even after years of spinning, never could master wrapping on a niddy noddy. For me, I find it quiet fluid! 🙂

After winding the yarn onto the niddy noddy, you tie off the yarn and then set the twist and/or full. I will talk about this in another post. 🙂

Lendrum DT Spinning Wheel

1 Lendrum


This is my new baby. Surprising, no? It’s definitely not for jewelry making, although you can spin beads into the fiber. 😉

We are a Waldorf Inspired household. Before I had my children I could have cared less about knitting and crochet. I had been slowly making time to teach myself to knit last year,but  finally decided to make a concerted effort at it during the holidays. I had a 3 month old, and spent a lot of time nursing & rocking…and I thought it would finally be a good time to dedicate a good amount of time for learning (read: a nice, quiet creative project so not to disturb baby). It went okay at first, but I found myself wanting to know more about the textile I was working with. How is yarn made? What is the difference between natural and synthetic fibers? Between machine or hand spun? Drop spindle or spinning wheel?

After watching a few videos on YouTube, I was totally intrigued about spinning and really wanted to get a wheel (I was pathetically clumsy with a drop spindle).

So after considering my options, I ended up purchasing a Lendrum Double Treadle. This is a scotch tensioning wheel, which meant nothing to me at the time, but I so enjoy spinning on this type of wheel now. Another post is needed for technical whatnots…

I chose this wheel because it is compact, folds for storage (not that I have never had a chance to store it!) and is locally made in Ontario. I am waiting for a plying head/jumbo flyer that I ordered back in the spring. Lendrums are in demand and worth the wait.

You can find  a local Lendrum dealer by visiting his website.

Spinning, understanding fiber and how yarn is formed has been like a kick start to my brain as far as knitting and crochet goes. Although I am still very much a beginner, since spinning patterns/stitched/formation make so much more sense to me. I bought this wheel in February and spin pretty much everyday we are home. A joy!

More info to follow…


Change of Plans…

Just as I get my website up and running, we decide to do some upgrades to our downstairs. It is time. We also bought a camper trailer, so our family will be on the open road for most of the summer…which has been a dream of ours for our family.

What this means is a much needed upgrade to give me a bonafide studio. The washer & dryer will be removed and moved into the downstairs washroom, giving me free reign of the entire space. We have been frantically packing up our lives in preparation; the jewelry supplies are boxed up for now, and should see the light of day again this fall. This summer I will post about my adventures in spinning fiber this winter/spring to keep the creativity flowing. I feel a total overhaul of the jewelry as well…I’m looking forward to the summer to mull it all over.

Per usual if you can still contact me for custom requests, I may or may not be able to fulfill them, but do feel free to write!

I look forward to showing off my new studio space. It is my dream to have a place that I can share with the community as well…jewelry making, beading, knit, crochet, card fiber, spin…excited to finally be moving in this direction…


Our Wedding – Some Inspiration

Dscf2586s

This year during our wedding anniversary, we went through some of our wedding photos for a little nostalgia. I thought I would post photos of our theme for those looking for a little wedding inspiration. I have posted my wedding jewelry on here before but not sure if I shared our favours, etc…

Credit for these photo should go to Chris Gallant Photography (if you are looking for a photographer in Halifax, NS for your event, I would highly recommend Chris & his team for their creativity, easy going attitudes and fun personalities :)).

I cannot remember off the top of my head the suppliers we used for flowers & cake – if you are interested send me a message directly and I will look it up for you. 🙂

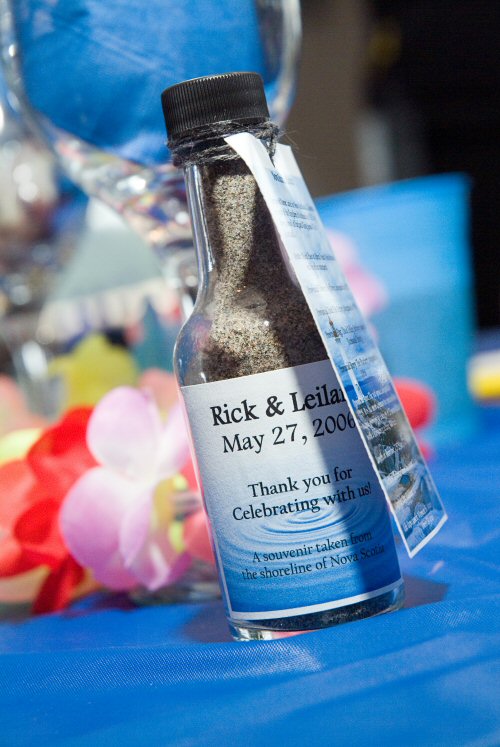
Our theme was tropical inspired on account of my Filipino heritage and the fact that we wanted our reception to be low key and laid back, however I still wanted to keep some traditional North American elements. These were the wedding favors I made myself. We had a lot of guests attend from all over Canada & the US, even one couple coming as far as Switzerland. So I got sand from the seaside of Nova Scotia, washed and bottled it myself. The bottles were bought in bulk online – hot sauce jars essentially. I made the labels as well as a “Nova Scotia Facts” tag.

Programs were made at home on my ink jet printer…

This was a fun little game to help our guests pass the time while waiting for us to arrive at the reception. We left cards and pens on the table so they could write predictions of where they saw us in 5 years. After they were completed they places them in a keepsake box on the guestbook table.

Dyed blue roses…they weren’t as expensive as we thought! I wanted something basic/traditional but slightly out of the norm… 🙂

Handmade wedding invitations. Textured paper and faux flowers and ribbon on the outside…

…the inside: announcement printed on vellum paper. The back is more faux flowers arranged on blue paper.

My shoes and clutch. These are ballroom dance shoes (for comfort) I hand dyed blue painting the color on with a brush. I had intended to go much darker but after two applications really liked the subtle blue tone. The clutch & shoes were purchased online. You can see my wedding necklace I made draped on the clutch.

On the guestbook table, we had photos of us as babies as well as a collage of the two of us made up of photos of us growing up (you can see it poking out on the left hand side of this photo).

I remember the cake maker was really excited to make our cake because he never got a request for a blue one.

For wedding jewelry inspiration, you can see mine here on these posts:

https://leilanihandmade.com/tour-jewelry-box-wedding-jewelry/

https://leilanihandmade.com/artist-inspired-prophetic-charm-bracelet/

The Website Is Up and Running…

Website

The website is reloaded and extensively tested, although there may be aspects I missed so if you find any glitches please contact me to let me know. I freshened up the overall look. I now feel like it reflects the brand better. When I first established the website I was just getting comfortable with it having moved over from using Etsy and Artfire. Now that I have my footing I feel like I know my way around the space better and know how I want my brand reflected.


I am slowly adding product back as I am going through a period of change and expansion with my creativity. I am looking to streamline my collection as well as update some of the looks. I feel a bit stuck because our house is up for renovation in the near future – including my workspace. This is much needed as I feel very uninspired in my space these days. It has also become a bit perilous of an area for the baby so my time in it is limited. Slowly things will get back into full swing, per usual you can always contact me directly if there is anythig you are specifically looking for.

Pardon the mess…while we renovate…

It’s been all about baby here the past six months, so much so I neglected my online presence to the point where we needed to do a critical upgrade and reinstall to both blogs and website. When it comes to web space, you simply cannot “set it and forget it”. I often chuckle at times like this when I see people complaining when a site like Etsy goes down briefly. I can only imagine what it takes to keep a community such as that up and running. Not that I agree with all the practices of  third part sites, which, is why I have my own space. I think it is worth mentioning however, if you are interested in getting your own website, be prepared to nanny it constantly or pay someone else to do it. If you don’t have that kind of time or resources it may not be for you.

So we are down for a few days…I decided to do a total regut of the jewelry buying site. We are also upgrading to a responsive web design – responsive being the new buzz word for websites that display/work properly on smart phones and tablets (like the ipad). Not upgrading and adding critical updates made the sites sluggish and vulnerable to hacks…particularly the blogs.  What a mess! Definitely could have saved us a lot of work if I was paying attention and not in total baby bliss. Moral to this story: never fall asleep at the switch of your website.

No matter – onward and upward. I do like a good tear down and gutting & in many ways this is what it feels like…a complete and total renovation. It feels fresh & new and in the long run I will be happier with it. In other words, I’ll stop pulling my hair out soon… 😉

I’m not up and running 100% yet anyway on account of the baby so do contact me directly with any requests…and stay tuned on what I have been doing while on “maternity leave” – mainly trying my hand at the textile arts: knitting, crochet, and…my absolute new obsession…spinning fiber on my Lendrum DT!!! 🙂